[standalone@localhost:9999 /] :read-children-names(child-type=interface)
{
   "outcome" => "success",
   "result" => [
       "management",
       "public"
   ]
}
Interfaces and ports
Interface declarations
WildFly 8 uses named interface references throughout the configuration. A network interface is declared by specifying a logical name and a selection criteria for the physical interface:
This means the server in question declares two interfaces: One is referred to as "management"; the other one "public". The "management" interface is used for all components and services that are required by the management layer (i.e. the HTTP Management Endpoint). The "public" interface binding is used for any application related network communication (i.e. Web, Messaging, etc). There is nothing special about these names; interfaces can be declared with any name. Other sections of the configuration can then reference those interfaces by their logical name, rather than having to include the full details of the interface (which, on servers in a management domain, may vary on different machines).
The domain.xml, host.xml and standalone.xml configuration files all include a section where interfaces can be declared. If we take a look at the XML declaration it reveals the selection criteria. The criteria is one of two types: either a single element indicating that the interface should be bound to a wildcard address, or a set of one or more characteristics that an interface or address must have in order to be a valid match. The selection criteria in this example are specific IP addresses for each interface:
<interfaces>
  <interface name="management">
   <inet-address value="127.0.0.1"/>
  </interface>
  <interface name="public">
   <inet-address value="127.0.0.1"/>
  </interface>
</interfaces>
Some other examples:
<interface name="global">
   <!-- Use the wildcard address -->
   <any-address/>
</interface>

<interface name="ipv4-global">
   <!-- Use the IPv4 wildcard address -->
   <any-ipv4-address/>
</interface>

<interface name="ipv6-global">
   <!-- Use the IPv6 wildcard address -->
   <any-ipv6-address/>
</interface>

<interface name="external">
   <nic name="eth0"/>
</interface>

<interface name="default">
   <!-- Match any interface/address on the right subnet if it's
        up, supports multicast and isn't point-to-point -->
   <subnet-match value="192.168.0.0/16"/>
   <up/>
   <multicast/>
   <not>
      <point-to-point/>
   </not>
</interface>
Socket Binding Groups
The socket configuration in WildFly 8 works similar to the interfaces declarations. Sockets are declared using a logical name, by which they will be referenced throughout the configuration. Socket declarations are grouped under a certain name. This allows you to easily reference a particular socket binding group when configuring server groups for instance (Managed Domain). Socket binding groups reference an interface by it's logical name:
<socket-binding-group name="standard-sockets" default-interface="public">
   <socket-binding name="jndi" port="1099"/>
   <socket-binding name="jmx-connector-registry" port="1090"/>
   <socket-binding name="jmx-connector-server" port="1091"/>
   <socket-binding name="http" port="8080"/>
   <socket-binding name="https" port="8443"/>
   <socket-binding name="jacorb" port="3528"/>
   <socket-binding name="jacorb-ssl" port="3529"/>
   <socket-binding name="osgi-http" port="8090"/>
   <socket-binding name="remoting" port="4447"/>
   <socket-binding name="txn-recovery-environment" port="4712"/>
   <socket-binding name="txn-status-manager" port="4713"/>
   <socket-binding name="messaging" port="5445"/>
   <socket-binding name="messaging-throughput" port="5455"/>
</socket-binding-group>
A socket binding includes the following information:
-
name -- logical name of the socket configuration that should be used elsewhere in the configuration
-
port -- base port to which a socket based on this configuration should be bound. (Note that servers can be configured to override this base value by applying an increment or decrement to all port values.)
-
interface (optional) -- logical name (see "Interfaces declarations" above) of the interface to which a socket based on this configuration should be bound. If not defined, the value of the "default-interface" attribute from the enclosing socket binding group will be used.
-
multicast-address (optional) -- if the socket will be used for multicast, the multicast address to use
-
multicast-port (optional) -- if the socket will be used for multicast, the multicast port to use
-
fixed-port (optional, defaults to false) -- if true, declares that the value of port should always be used for the socket and should not be overridden by applying an increment or decrement
IPv4 versus IPv6
WildFly 8 supports the use of both IPv4 and IPv6 addresses. By default, WildFly is configured for use in an IPv4 network and so if you are running in an IPv4 network, no changes are required. If you need to run in an IPv6 network, the changes required are minimal and involve changing the JVM stack and address preferences, and adjusting any interface IP address values specified in the configuration (standalone.xml or domain.xml).
Stack and address preference
The system properties java.net.preferIPv4Stack and java.net.preferIPv6Addresses are used to configure the JVM for use with IPv4 or IPv6 addresses. With WildFly 8, in order to run using IPv4 addresses, we need to specify java.net.preferIPv4Stack=true; in order to run with IPv6 addresses, we need to specify java.net.preferIPv4Stack=false (the JVM default) and java.net.preferIPv6Addresses=true. The latter ensures that any hostname to IP address conversions always return IPv6 address variants.
These system properties are conveniently set by the JAVA_OPTS environment variable, defined in the standalone.conf (or domain.conf) file. For example, to change the IP stack preference from its default of IPv4 to IPv6, edit the standalone.conf (or domain.conf) file and change its default IPv4 setting:
if [ "x$JAVA_OPTS" = "x" ]; then
   JAVA_OPTS=" ... -Djava.net.preferIPv4Stack=true ..."
...
to an IPv6 suitable setting:
if [ "x$JAVA_OPTS" = "x" ]; then
   JAVA_OPTS=" ... -Djava.net.preferIPv4Stack=false -Djava.net.preferIPv6Addresses=true ..."
...
IP address literals
To change the IP address literals referenced in standalone.xml (or domain.xml), first visit the interface declarations and ensure that valid IPv6 addresses are being used as interface values. For example, to change the default configuration in which the loopback interface is used as the primary interface, change from the IPv4 loopback address:
<interfaces>
  <interface name="management">
    <inet-address value="${jboss.bind.address.management:127.0.0.1}"/>
  </interface>
  <interface name="public">
    <inet-address value="${jboss.bind.address:127.0.0.1}"/>
  </interface>
</interfaces>
to the IPv6 loopback address:
<interfaces>
  <interface name="management">
    <inet-address value="${jboss.bind.address.management:[::1]}"/>
  </interface>
  <interface name="public">
    <inet-address value="${jboss.bind.address:[::1]}"/>
  </interface>
</interfaces>
Note that when embedding IPv6 address literals in the substitution expression, square brackets surrounding the IP address literal are used to avoid ambiguity. This follows the convention for the use of IPv6 literals in URLs.
Over and above making such changes for the interface definitions, you should also check the rest of your configuration file and adjust IP address literals from IPv4 to IPv6 as required.
Configure Security Realms
Within WildFly 8 we make use of security realms to secure access to the management interfaces, these same realms are used to secure inbound access as exposed by JBoss Remoting such as remote JNDI and EJB access, the realms are also used to define an identity for the server - this identity can be used for both inbound connections to the server and outbound connections being established by the server.
General Structure
The general structure of a management realm definition is: -
<security-realm name="ManagementRealm">
   <plug-ins></plug-ins>
   <server-identities></server-identities>
   <authentication></authentication>
   <authorization></authorization>
</security-realm>
-
plug-ins - This is an optional element that is used to define modules what will be searched for security realm PlugInProviders to extend the capabilities of the security realms.
-
server-identities - An optional element to define the identity of the server as visible to the outside world, this applies to both inbound connection to a resource secured by the realm and to outbound connections also associated with the realm.
One example is the SSL identity of the server, for inbound connections this will control the identity of the server as the SSL connection is established, for outbound connections this same identity can be used where CLIENT-CERT style authentication is being performed.
A second example is where the server is establishing an outbound connection that requires username / password authentication - this element can be used to define that password.
-
authentication - This is probably the most important element that will be used within a security realm definition and mostly applies to inbound connections to the server, this element defines which backing stores will be used to provide the verification of the inbound connection.
This element is optional as there are some scenarios where it will not be required such as if a realm is being defined for an outbound connection using a username and password.
-
authorization - This is the final optional element and is used to define how roles are loaded for an authenticated identity. At the moment this is more applicable for realms used for access to EE deployments such as web applications or EJBs but this will also become relevant as we add role based authorization checks to the management model.
Enabling a Realm
After a realm has been defined it needs to be associated with an inbound or outbound connection for it to be used, the following are some examples where these associations are used within the WildFly 8 configuration.
Inbound Connections
Management Interfaces
Either within the standalone.xml or host.xml configurations the security realms can be associated with the management interfaces as follows: -
<native-interface security-realm="ManagementRealm">...</native-interface>
<http-interface security-realm="ManagementRealm">...</http-interface>
If the security-realm attribute is omitted or removed from the interface definition it means that access to that interface will be unsecured
By default we do bind these interfaces to the loopback address so that the interfaces are not accessible remotely out of the box, however do be aware that if these interfaces are then unsecured any other local user will be able to control and administer the WildFly 8 installation.
Also do note that the security-realm attribute is defined on each interface independently, this means that you could define a different security realm for each - this may be applicable if say you want the administrators to only access over the HTTP interface and leave only local users to access the native interface.
Remoting Subsystem
The Remoting subsystem exposes a connector to allow for inbound communications with JNDI and the EJB subsystem by default we associate the ApplicationRealm with this connection.
<subsystem xmlns="urn:jboss:domain:remoting:1.1">
  <connector name="remoting-connector" socket-binding="remoting" security-realm="ApplicationRealm"/>
</subsystem>
Outbound Connections
Remoting Subsystem
Outbound connections can also be defined within the Remoting subsystem, these are typically used for remote EJB invocations from one AS server to another, in this scenario the security realm is used to obtain the server identity either it's password for X.509 certificate and possibly a trust store to verify the certificate of the remote host.
Even if the referenced realm contains username and password authentication configuration the client side of the connection will NOT use this to verify the remote server.
<remote-outbound-connection name="remote-ejb-connection"
                            outbound-socket-binding-ref="binding-remote-ejb-connection"
                            username="user1"
                            security-realm="PasswordRealm">
The security realm is only used to obtain the password for this example, as you can see here the username is specified separately.
Slave Host Controller
When running in domain mode slave host controllers need to establish a connection to the native interface of the master domain controller so these also need a realm for the identity of the slave.
<domain-controller>
  <remote host="${jboss.domain.master.address}" port="${jboss.domain.master.port:9999}" security-realm="ManagementRealm"/>
</domain-controller>
By default when a slave host controller authenticates against the master domain controller it uses its configured name as its username. If you want to override the username used for authentication a username attribute can be added to the <remote /> element.
Authentication
One of the primary functions of the security realms is to define the user stores that will be used to verify the identity of inbound connections, the actual approach taken at the transport level is based on the capabilities of these backing store definitions. The security realms are used to secure inbound connections for both the http management interface and for inbound remoting connections for both the native management interface and to access other services exposed over remoting - because of this there are some small differences between how the realm is used for each of these.
At the transport level we support the following authentication mechanisms.
|
HTTP |
Remoting (SASL) |
|
None |
Anonymous |
|
N/A |
JBoss Local User |
|
Digest |
Digest |
|
Basic |
Plain |
|
Client Cert |
Client Cert |
The most notable are the first two in this list as they need some additional explanation - the final 3 are fairly standard mechanisms.
If either the http interface, the native interface or a remoting connection are defined without a security realm reference then they are effectively unsecured, in the case of the http interface this means that no authentication will be performed on the incoming connection - for the remoting connections however we make use of SASL so require at least one authentication mechanism so make use of the anonymous mechanism to allow a user in without requiring a validated authentication process.
The next mechanism 'JBoss Local User' is specific to the remoting connections - as we ship WildFly 8 secured by default we wanted a way to allow users to connect to their own AS installation after it is started without mandating that they define a user with a password - to accomplish this we have added the 'JBoss Local User' mechanism. This mechanism makes the use of tokens exchanged on the filesystem to prove that the client is local to the AS installation and has the appropriate file permissions to read a token written by the AS to file. As this mechanism is dependent on both server and client implementation details it is only supported for the remoting connections and not the http connections - at some point we may review if we can add support for this to the http interface but we would need to explore the options available with the commonly used web browsers that are used to communicate with the http interface.
The Digest mechanism is simply the HTTP Digest / SASL Digest mechanism that authenticates the user by making use of md5 hashed including nonces to avoid sending passwords in plain text over the network - this is the preferred mechanism for username / password authentication.
The HTTP Basic / SASL Plain mechanism is made available for times that Digest can not be used but effectively this means that the users password will be sent over the network in the clear unless SSL is enabled.
The final mechanism Client-Cert allows X.509 certificates to be used to verify the identity of the remote client.
One point bearing in mind is that it is possible that an association with a realm can mean that a single incoming connection has the ability to choose between one or more authentication mechanisms. As an example it is possible that an incoming remoting connection could choose between 'Client Cert', A username password mechanism or 'JBoss Local User' for authentication - this would allow say a local user to use the local mechanism, a remote user to supply their username and password whilst a remote script could make a call and authenticate using a certificate.
Authorization
The actual security realms are not involved in any authorization decisions however they can be configured to load a users roles which will subsequently be used to make authorization decisions - when references to authorization are seen in the context of security realms it is this loading of roles that is being referred to.
For the loading of roles the process is split out to occur after the authentication step so after a user has been authenticated a second step will occur to load the roles based on the username they used to authenticate with.
Out Of The Box Configuration
Before describing the complete set of configuration options available within the realms we will look at the default configuration as for most users that is going to be the starting point before customising further.
The examples here are taken from the standalone configuration however the descriptions are equally applicable to domain mode, one point worth noting is that all security realms defined in the host.xml are available to be referenced within the domain configuration for the servers running on that host controller.
Management Realm
<security-realm name="ManagementRealm">
  <authentication>
    <local default-user="$local"/>
    <properties path="mgmt-users.properties" relative-to="jboss.server.config.dir"/>
  </authentication>
</security-realm>
The realm ManagementRealm is the simplest realm within the default configuration, this realm simply enables two authentication mechanisms, the local mechanism and username/password authentication which will be using Digest authentication.
-
local
When using the local mechanism it is optional for remote clients to send a username to the server, this configuration specifies that where clients do not send a username it will be assumed that the clients username is $local - the <local /> element can also be configured to allow other usernames to be specified by remote clients however for the default configuration this is not enabled so is not supported.
-
properties
For username / password authentication the users details will be loaded from the file mgmt-users.properties which is located in {jboss.home}/standalone/configuration or {jboss.home}/domain/configuration depending on the running mode of the server.
Each user is represented on their own line and the format of each line is username=HASH where HASH is a pre-prepared hash of the users password along with their username and the name of the realm which in this case is ManagementRealm.
You do not need to worry about generating the entries within the properties file as we provide a utility add-user.sh or add-user.bat to add the users, this utility is described in more detail below.
By pre-hashing the passwords in the properties file it does mean that if the user has used the same password on different realms then the contents of the file falling into the wrong hands does not necessarily mean all accounts are compromised. HOWEVER the contents of the files do still need to be protected as they can be used to access any server where the realm name is the same and the user has the same username and password pair.
Application Realm
<security-realm name="ApplicationRealm">
  <authentication>
    <local default-user="$local" allowed-users="*"/>
    <properties path="application-users.properties" relative-to="jboss.server.config.dir"/>
  </authentication>
  <authorization>
    <properties path="application-roles.properties" relative-to="jboss.server.config.dir"/>
  </authorization>
</security-realm>
The realm ApplicationRealm is a slightly more complex realm as this is used for both
Authentication
The authentication configuration is very similar to the ManagementRealm in that it enabled both the local mechanism and a username/password based Digest mechanism.
-
local
The local configuration is similar to the ManagementRealm in that where the remote user does not supply a username it will be assumed that the username is $local, however in addition to this there is now an allowed-users attribute with a value of '*' - this means that the remote user can specify any username and it will be accepted over the local mechanism provided that the local verification is a success.
To restrict the usernames that can be specified by the remote user a comma separated list of usernames can be specified instead within the allowed-users attribute.
-
properties
The properties definition works in exactly the same way as the definition for ManagementRealm except now the properties file is called application-users.properties.
Authorization
The contents of the Authorization element are specific to the ApplicationRealm, in this case a properties file is used to load a users roles.
The properties file is called application-roles.properties and is located in {jboss.home}/standalone/configuration or {jboss.home}/domain/configuration depending on the running mode of the server. The format of this file is username=ROLES where ROLES is a comma separated list of the users roles.
As the loading of a users roles is a second step this is where it may be desirable to restrict which users can use the local mechanism so that some users still require username and password authentication for their roles to be loaded.
other security domain
<security-domain name="other" cache-type="default">
  <authentication>
    <login-module code="Remoting" flag="optional">
      <module-option name="password-stacking" value="useFirstPass"/>
    </login-module>
    <login-module code="RealmDirect" flag="required">
      <module-option name="password-stacking" value="useFirstPass"/>
    </login-module>
  </authentication>
</security-domain>
When applications are deployed to the application server they are associated with a security domain within the security subsystem, the other security domain is provided to work with the ApplicationRealm, this domain is defined with a pair of login modules Remoting and RealmDirect.
-
Remoting
The Remoting login module is used to check if the request currently being authenticated is a request received over a Remoting connection, if so the identity that was created during the authentication process is used and associated with the current request.
If the request did not arrive over a Remoting connection this module does nothing and allows the JAAS based login to continue to the next module.
-
RealmDirect
The RealmDirect login module makes use of a security realm to authenticate the current request if that did not occur in the Remoting login module and then use the realm to load the users roles, by default this login module assumes the realm to use is called ApplicationRealm although other names can be overridden using the "realm" module-option.
The advantage of this approach is that all of the backing store configuration can be left within the realm with the security domain just delegating to the realm.
user.sh
For use with the default configuration we supply a utility add-user which can be used to manage the properties files for the default realms used to store the users and their roles.
The add-user utility can be used to manage both the users in the ManagementRealm and the users in the ApplicationRealm, changes made apply to the properties file used both for domain mode and standalone mode.
After you have installed your application server and decided if you are going to run in standalone mode or domain mode you can delete the parent folder for the mode you are not using, the add-user utility will then only be managing the properties file for the mode in use.
The add-user utility is a command line utility however it can be run in both interactive and non-interactive mode. Depending on your platform the script to run the add-user utility is either add-user.sh or add-user.bat which can be found in {jboss.home}/bin.
This guide now contains a couple of examples of this utility in use to accomplish the most common tasks.
Adding a User
Adding users to the properties files is the primary purpose of this utility.
The server caches the contents of the properties files in memory, however the server does check the modified time of the properties files on each authentication request and re-load if the time has been updated - this means all changes made by this utility are immediately applied to any running server.
A Management User
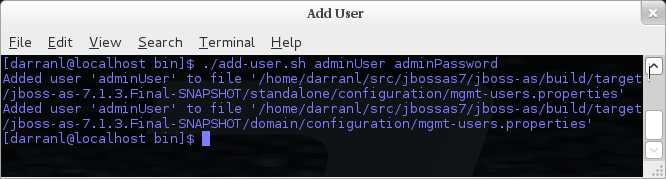
The default name of the realm for management users is ManagementRealm, when the utility prompts for the realm name just accept the default unless you have switched to a different realm.
Interactive Mode

Here we have added a new Management User called adminUser, as you can see some of the questions offer default responses so you can just press enter without repeating the default value.
For now just answer n or no to the final question, adding users to be used by processes is described in more detail in the domain management chapter.
Interactive Mode
To add a user in non-interactive mode the command ./add-user.sh {username} {password} can be used.
If you add users using this approach there is a risk that any other user that can view the list of running process may see the arguments including the password of the user being added, there is also the risk that the username / password combination will be cached in the history file of the shell you are currently using.
An Application User
When adding application users in addition to adding the user with their pre-hashed password it is also now possible to define the roles of the user.
Interactive Mode
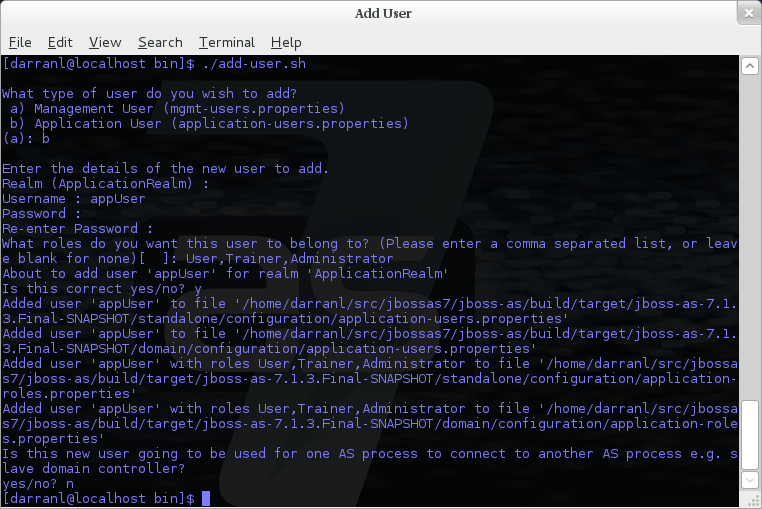
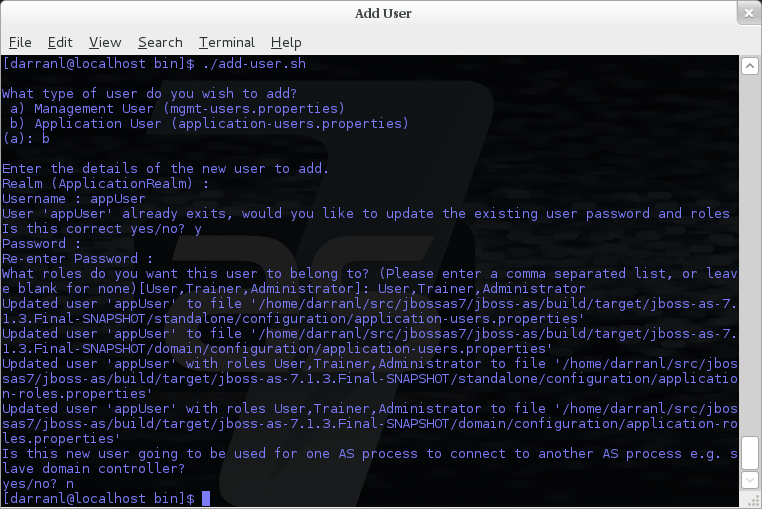
Here a new user called appUser has been added, in this case a comma separated list of roles has also been specified.
As with adding a management user just answer n or no to the final question until you know you are adding a user that will be establishing a connection from one server to another.
Interactive Mode
To add an application user non-interactively use the command ./add-user.sh -a {username} {password}.
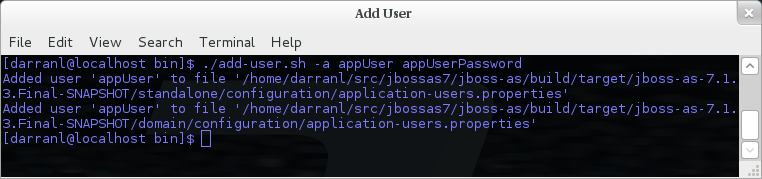
Non-interactive mode does not support defining a list of users, to associate a user with a set of roles you will need to manually edit the application-roles.properties file by hand.
Updating a User
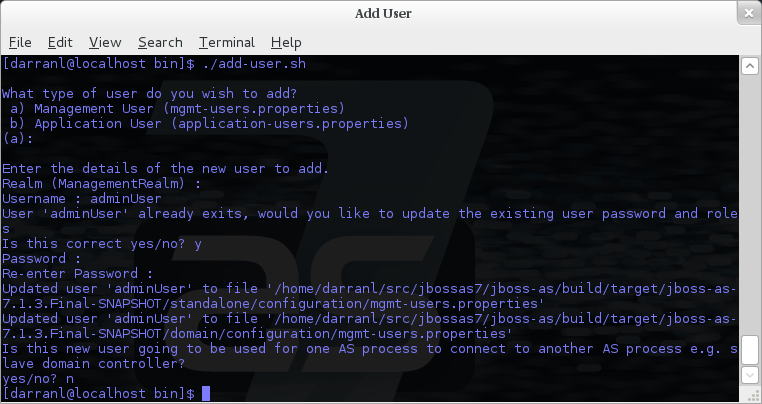
Within the add-user utility it is also possible to update existing users, in interactive mode you will be prompted to confirm if this is your intention.
A Management User
Interactive Mode
Interactive Mode
In non-interactive mode if a user already exists the update is automatic with no confirmation prompt.
An Application User
Interactive Mode
On updating a user with roles you will need to re-enter the list of roles assigned to the user.
Interactive Mode
In non-interactive mode if a user already exists the update is automatic with no confirmation prompt.
Community Contributions
There are still a few features to add to the add-user utility such as removing users or adding application users with roles in non-interactive mode, if you are interested in contributing to WildFly development the add-user utility is a good place to start as it is a stand alone utility, however it is a part of the AS build so you can become familiar with the AS development processes without needing to delve straight into the internals of the application server.
JMX
When configuring the security realms remote access to the servers MBeanServer needs a special mention, when running in standalone mode the following is the default configuration: -
<native-interface security-realm="ManagementRealm">...</native-interface>
<subsystem xmlns="urn:jboss:domain:jmx:1.1">
  ...
  <remoting-connector/>
</subsystem>
With this configuration remote access to JMX is provided over the native management interface, this is secured using the realm ManagementRealm, this means that any user that can connect to the native interface can also use this interface to access the MBeanServer - to disable this just remove the <remoting-connector /> element.
In domain mode it is slightly more complicated as the native interface is exposed by the host controller process however each application server is running in it's own process so by default remote access to JMX is disabled.
<subsystem xmlns="urn:jboss:domain:remoting:1.1">
  <connector name="remoting-connector" socket-binding="remoting" security-realm="ApplicationRealm"/>
</subsystem>
<subsystem xmlns="urn:jboss:domain:jmx:1.1">
  ...
  <!--<remoting-connector use-management-endpoint="false"/>-->
</subsystem>
To enable remote access to JMX uncomment the <remoting-connector /> element however be aware that this will make the MBeanServer accessible over the same Remoting connector used for remote JNDI and EJB access - this means that any user that can authenticate against the realm ApplicationRealm will be able to access the MBeanServer.
The following Jira issue is currently outstanding to allow access to the individual MBeanServers by proxying through the host controllers native interface AS7-4009, if this is a feature you would use please add your vote to the issue.
Detailed Configuration
This section of the documentation describes the various configuration options when defining realms, plug-ins are a slightly special case so the configuration options for plug-ins is within it's own section.
Within a security realm definition there are four optional elements <plug-ins />, <server-identities />, <authentication />, and <authorization />, as mentioned above plug-ins is defined within it's own section below so we will begin by looking at the <server-identities /> element.
<server-identities />
The server identities section of a realm definition is used to define how a server appears to the outside world, currently this element can be used to configure a password to be used when establishing a remote outbound connection and also how to load a X.509 key which can be used for both inbound and outbound SSL connections.
<ssl />
<server-identities>
  <ssl protocol="...">
    <keystore path="..." relative-to="..." keystore-password="..." alias="..." key-password="..." />
  </ssl>
</server-identities>
-
protocol - By default this is set to TLS and in general does not need to be set.
The SSL element then contains the nested <keystore /> element, this is used to define how to load the key from the file based (JKS) keystore.
-
path (mandatory) - This is the path to the keystore, this can be an absolute path or relative to the next attribute.
-
relative-to (optional) - The name of a service representing a path the keystore is relative to.
-
keystore-password (mandatory) - The password required to open the keystore.
-
alias (optional) - The alias of the entry to use from the keystore - for a keystore with multiple entries in practice the first usable entry is used but this should not be relied on and the alias should be set to guarantee which entry is used.
-
key-password (optional) - The password to load the key entry, if omitted the keystore-password will be used instead.
If you see the error UnrecoverableKeyException: Cannot recover key the most likely cause that you need to specify a key-password and possible even an alias as well to ensure only one key is loaded.
<secret />
<server-identities>
  <secret value="..." />
</server-identities>
-
value (mandatory) - The password to use for outbound connections encoded as Base64, this field also supports a vault expression should stronger protection be required.
The username for the outbound connection is specified at the point the outbound connection is defined.
<authentication />
The authentication element is predominantly used to configure the authentication that is performed on an inbound connection, however there is one exception and that is if a trust store is defined - on negotiating an outbound SSL connection the trust store will be used to verify the remote server.
<authentication>
  <truststore />
  <local />
  <jaas />
  <ldap />
  <properties />
  <users />
  <plug-in />
</authentication>
An authentication definition can have zero or one <truststore />, it can also have zero or one <local /> and it can also have one of <jaas />, <ldap />, <properties />, <users />, and <plug-in /> i.e. the local mechanism and a truststore for certificate verification can be independent switched on and off and a single username / password store can be defined.
<truststore />
<authentication>
  <truststore path="..." relative-to="..." keystore-password="..."/>
</authentication>
This element is used to define how to load a key store file that can be used as the trust store within the SSLContext we create internally, the store is then used to verify the certificates of the remote side of the connection be that inbound or outbound.
-
path (mandatory) - This is the path to the keystore, this can be an absolute path or relative to the next attribute.
-
relative-to (optional) - The name of a service representing a path the keystore is relative to.
-
keystore-password (mandatory) - The password required to open the keystore.
Although this is a definition of a trust store the attribute for the password is keystore-password, this is because the underlying file being opened is still a key store.
<local />
<authentication>
  <local default-user="..." allowed-users="..." />
</authentication>
This element switches on the local authentication mechanism that allows clients to the server to verify that they are local to the server, at the protocol level it is optional for the remote client to send a user name in the authentication response.
-
default-user (optional) - If the client does not pass in a username this is the assumed username, this value is also automatically added to the list of allowed-users.
-
allowed-users (optional) - This attribute is used to specify a comma separated list of users allowed to authenticate using the local mechanism, alternatively '*' can be specified to allow any username to be specified.
<jaas />
<authentication>
  <jaas name="..." />
</authentication>
The jaas element is used to enable username and password based authentication where the supplied username and password are verified by making use of a configured jaas domain.
-
name (mandatory) - The name of the jaas domain to use to verify the supplied username and password.
As JAAS authentication works by taking a username and password and verifying these the use of this element means that at the transport level authentication will be forced to send the password in plain text, any interception of the messages exchanged between the client and server without SSL enabled will reveal the users password.
<ldap />
<authentication>
  <ldap connection="..." base-dn="..." recursive="..." user-dn="...">
    <username-filter attribute="..." />
    <advanced-filter filter="..." />
  </ldap>
</authentication>
The ldap element is used to define how LDAP searches will be used to authenticate a user, this works by first connecting to LDAP and performing a search using the supplied user name to identity the distinguished name of the user and then a subsequent connection is made to the server using the password supplied by the user - if this second connection is a success then authentication succeeds.
Due to the verification approach used this configuration causes the authentication mechanisms selected for the protocol to cause the password to be sent from the client in plain text, the following Jira issue is to investigating proxying a Digest authentication with the LDAP server so no plain text password is needed AS7-4195.
-
connection (mandatory) - The name of the connection to use to connect to LDAP.
-
base-dn (mandatory) - The distinguished name of the context to use to begin the search from.
-
recursive (optional) - Should the filter be executed recursively? Defaults to false.
-
user-dn (optional) - After the user has been found specifies which attribute to read for the users distinguished name, defaults to 'dn'.
Within the ldap element only one of <username-filter /> or <advanced-filter /> can be specified.
<username-filter />
This element is used for a simple filter to match the username specified by the remote user against a single attribute, as an example with Active Directory the match is most likely to be against the 'sAMAccountName' attribute.
-
attribute (mandatory) - The name of the field to match the users supplied username against.
<advanced-filter />
This element is used where a more advanced filter is required, one example use of this filter is to exclude certain matches by specifying some additional criteria for the filter.
-
filter (mandatory) - The filter to execute to locate the user, this filter should contain '{0}' as a place holder for the username supplied by the user authenticating.
<properties />
<authentication>
  <properties path="..." relative-to="..." plain-text="..." />
</authentication>
The properties element is used to reference a properties file to load to read a users password or pre-prepared digest for the authentication process.
-
path (mandatory) - The path to the properties file, either absolute or relative to the path referenced by the relative-to attribute.
-
relative-to (optional) - The name of a path service that the defined path will be relative to.
-
plain-text (optional) - Setting to specify if the passwords are stored as plain text within the properties file, defaults to false.
By default the properties files are expected to store a pre-prepared hash of the users password in the form HEX( MD5( username ':' realm ':' password))
<users />
<authentication>
  <users>
    <user username="...">
      <password>...</password>
    </user>
  </users>
</authentication>
This is a very simple store of a username and password that stores both of these within the domain model, this is only really provided for the provision of simple examples.
-
username (mandatory) - A users username.
The <password/> element is then used to define the password for the user.
<authorization />
The authorization element is used to define how a users roles can be loaded after the authentication process completes, these roles may then be used for subsequent authorization decisions based on the service being accessed. At the moment only a properties file approach or a custom plug-in are supported - support for loading roles from LDAP or from a database are planned for a subsequent release.
<authorization>
  <properties />
  <plug-in />
</authorization>
<properties />
<authorization>
  <properties path="..." relative-to="..." />
</authorization>
The format of the properties file is username={ROLES} where {ROLES} is a comma separated list of the users roles.
-
path (mandatory) - The path to the properties file, either absolute or relative to the path referenced by the relative-to attribute.
-
relative-to (optional) - The name of a path service that the defined path will be relative to.
<outbound-connection />
Strictly speaking these are not a part of the security realm definition, however at the moment they are only used by security realms so the definition of outbound connection is described here.
<management>
  <security-realms />
  <outbound-connections>
    <ldap />
  </outbound-connections>
</management>
<ldap />
At the moment we only support outbound connections to ldap servers for the authentication process - this will later be expanded when we add support for database based authentication.
<outbound-connections>
  <ldap name="..." url="..." search-dn="..." search-credential="..." initial-context-factory="..." />
</outbound-connections>
The outbound connections are defined in this section and then referenced by name from the configuration that makes use of them.
-
name (mandatory) - The unique name used to reference this connection.
-
url (mandatory) - The URL use to establish the LDAP connection.
-
search-dn (mandatory) - The distinguished name of the user to authenticate as to perform the searches.
-
search-credential (mandatory) - The password required to connect to LDAP as the search-dn.
-
initial-context-factory (optional) - Allows overriding the initial context factory, defaults to 'com.sun.jndi.ldap.LdapCtxFactory'
Plug Ins
Within WildFly 8, for communication with the management interfaces and for other services exposed using Remoting where username / password authentication is used, the use of Digest authentication is preferred over the use of HTTP Basic or SASL Plain so that we can avoid the sending of password in the clear over the network. For validation of the digests to work on the server we either need to be able to retrieve a user's plain text password or we need to be able to obtain a ready prepared hash of their password along with the username and realm.
Previously to allow the addition of custom user stores we have added an option to the realms to call out to a JAAS domain to validate a user's username and password. The problem with this approach is that to call JAAS we need the remote user to send in their plain text username and password so that a JAAS LoginModule can perform the validation. This forces us down to use either the HTTP Basic authentication mechanism or the SASL Plain mechanism depending on the transport used which is undesirable as we can not longer use Digest.
To overcome this we now support plugging in custom user stores to support loading a user's password hash, and roles from a custom store to allow different stores to be implemented without forcing the authentication back to plain text variant. This article describes the requirements for a plug-in and shows a simple example plug-in for use with WildFly 8.
When implementing a plug-in, there are two steps to the authentication process. The first step is to load the user's identity and credential from the relevant store - this is then used to verify the user attempting to connect is valid. After the remote user is validated, we then load the user's roles in a second step. For this reason, the support for plug-ins is split into the two stages, when providing a plug-in either of these two steps can be implemented but there is no requirement to implement the other side.
When implementing a plug-in, the following interfaces are the bare minimum that need to be implemented so depending on if a plug-in to load a user's identity or a plug-in to load a user's roles is being implemented you will be implementing one of these interfaces.
Note - All classes and interfaces of the SPI to be implemented are in the 'org.jboss.as.domain.management.plugin' package which is a part of the 'org.jboss.as.domain-management' module but for simplicity for the rest of this section only the short names will be shown.
AuthenticationPlugIn
To implement an AuthenticationPlugIn the following interface needs to be implemented: -
public interface AuthenticationPlugIn<T extends Credential> {
    Identity<T> loadIdentity(final String userName, final String realm) throws IOException;
}
During the authentication process, this method will be called with the user name supplied by the remote user and the name of the realm they are authenticating against. This method call represents that an authentication attempt is occurring but it is the Identity instance that is returned that will be used for the actual authentication to verify the remote user.
The Identity interface is also an interface you will implement: -
public interface Identity<T extends Credential> {
    String getUserName();
    T getCredential();
}
Additional information can be contained within the Identity implementation although it will not currently be used, the key piece of information here is the Credential that will be returned - this needs to be one of the following: -
PasswordCredential
public final class PasswordCredential implements Credential {
    public PasswordCredential(final char[] password);
    public char[] getPassword();
    void clear();
}
The PasswordCredential is already implemented so use this class if you have the plain text password of the remote user, by using this the secured interfaces will be able to continue using the Digest mechanism for authentication.
DigestCredential
public final class DigestCredential implements Credential {
    public DigestCredential(final String hash);
    public String getHash();
}
This class is also already implemented and should be returned if instead of the plain text password you already have a pre-prepared hash of the username, realm and password.
ValidatePasswordCredential
public interface ValidatePasswordCredential extends Credential {
    boolean validatePassword(final char[] password);
}
This is a special Credential type to use when it is not possible to obtain either a plain text representation of the password or a pre-prepared hash - this is an interface as you will need to provide an implementation to verify a supplied password. The down side of using this type of Credential is that the authentication mechanism used at the transport level will need to drop down from Digest to either HTTP Basic or SASL Plain which will now mean that the remote client is sending their credential across the network in the clear.
If you use this type of credential be sure to force the mechanism choice to Plain as described in the configuration section below.
AuthorizationPlugIn
If you are implementing a custom mechanism to load a users roles you need to implement the AuthorizationPlugIn
public interface AuthorizationPlugIn {
    String[] loadRoles(final String userName, final String realm) throws IOException;
}
As with the AuthenticationPlugIn, this has a single method that takes a user's userName and realm - the return type is an array of Strings with each entry representing a role the user is a member of.
PlugInConfigurationSupport
In addition to the specific interfaces above, there is an additional interface that a plug-in can implement to receive configuration information before the plug-in is used and also to receive a Map instance that can be used to share state between the plug-in instance used for the authentication step of the call and the plug-in instance used for the authorization step.
public interface PlugInConfigurationSupport {
    void init(final Map<String, String> configuration, final Map<String, Object> sharedState) throws IOException;
}
Installing and Configuring a Plug-In
The next step of this article describes the steps to implement a plug-in provider and how to make it available within WildFly 8 and how to configure it. Example configuration and an example implementation are shown to illustrate this.
The following is an example security realm definition which will be used to illustrate this: -
<security-realm name="PlugInRealm">
   <plug-ins>
      <plug-in module="org.jboss.as.sample.plugin"/>
   </plug-ins>
   <authentication>
      <plug-in name="Sample">
         <properties>
            <property name="darranl.password" value="dpd"/>
            <property name="darranl.roles" value="Admin,Banker,User"/>
         </properties>
      </plug-in>
   </authentication>
   <authorization>
      <plug-in name="Delegate" />
   </authorization>
</security-realm>
Before looking closely at the packaging and configuration there is one more interface to implement and that is the PlugInProvider interface. This interface is responsible for making PlugIn instances available at runtime to handle the requests.
PlugInProvider
public interface PlugInProvider {
    AuthenticationPlugIn<Credential> loadAuthenticationPlugIn(final String name);
    AuthorizationPlugIn loadAuthorizationPlugIn(final String name);
}
These methods are called with the name that is supplied in the plug-in elements that are contained within the authentication and authorization elements of the configuration, based on the sample configuration above the loadAuthenticationPlugIn method will be called with a parameter of 'Sample' and the loadAuthorizationPlugIn method will be called with a parameter of 'Delegate'.
Multiple plug-in providers may be available to the application server so if a PlugInProvider implementation does not recognise a name then it should just return null and the server will continue searching the other providers. If a PlugInProvider does recognise a name but fails to instantiate the PlugIn then a RuntimeException can be thrown to indicate the failure.
As a server could have many providers registered it is recommended that a naming convention including some form of hierarchy is used e.g. use package style names to avoid conflicts.
For the example the implementation is as follows: -
public class SamplePluginProvider implements PlugInProvider {

    public AuthenticationPlugIn<Credential> loadAuthenticationPlugIn(String name) {
        if ("Sample".equals(name)) {
            return new SampleAuthenticationPlugIn();
        }
        return null;
    }

    public AuthorizationPlugIn loadAuthorizationPlugIn(String name) {
        if ("Sample".equals(name)) {
            return new SampleAuthenticationPlugIn();
        } else if ("Delegate".equals(name)) {
            return new DelegateAuthorizationPlugIn();
        }
        return null;
    }
}
The load methods are called for each authentication attempt but it will be an implementation detail of the provider if it decides to return a new instance of the provider each time - in this scenario as we also use configuration and shared state then new instances of the implementations make sense.
To load the provider use a ServiceLoader so within the META-INF/services folder of the jar this project adds a file called 'org.jboss.as.domain.management.plugin.PlugInProvider' - this contains a single entry which is the fully qualified class name of the PlugInProvider implementation class.
org.jboss.as.sample.SamplePluginProvider
Package as a Module
To make the PlugInProvider available to the application it is bundled as a module and added to the modules already shipped with WildFly 8.
To add as a module we first need a module.xml: -
<?xml version="1.0" encoding="UTF-8"?>

<module xmlns="urn:jboss:module:1.1" name="org.jboss.as.sample.plugin">
    <properties>
    </properties>

    <resources>
        <resource-root path="SamplePlugIn.jar"/>
    </resources>

    <dependencies>
        <module name="org.jboss.as.domain-management" />
    </dependencies>
</module>
The interfaces being implemented are in the 'org.jboss.as.domain-management' module so a dependency on that module is defined, this module.xml is then placed in the '{jboss.home}/modules/org/jboss/as/sample/plugin/main'.
The compiled classes and META-INF/services as described above are assembled into a jar called SamplePlugIn.jar and also placed into this folder.
Looking back at the sample configuration at the top of the realm definition the following element was added: -
   <plug-ins>
      <plug-in module="org.jboss.as.sample.plugin"/>
   </plug-ins>
This element is used to list the modules that should be searched for plug-ins. As plug-ins are loaded during the server start up, this search is a lazy search, so don't expect a definition to a non-existent module or to a module that does not contain a plug-in to report an error.
The AuthenticationPlugIn
The example AuthenticationPlugIn is implemented as: -
public class SampleAuthenticationPlugIn extends AbstractPlugIn {

    private static final String PASSWORD_SUFFIX = ".password";
    private static final String ROLES_SUFFIX = ".roles";
    private Map<String, String> configuration;

    public void init(Map<String, String> configuration, Map<String, Object> sharedState) throws IOException {
        this.configuration = configuration;
        // This will allow an AuthorizationPlugIn to delegate back to this instance.
        sharedState.put(AuthorizationPlugIn.class.getName(), this);
    }

    public Identity loadIdentity(String userName, String realm) throws IOException {
        String passwordKey = userName + PASSWORD_SUFFIX;
        if (configuration.containsKey(passwordKey)) {
            return new SampleIdentity(userName, configuration.get(passwordKey));
        }
        throw new IOException("Identity not found.");
    }

    public String[] loadRoles(String userName, String realm) throws IOException {
        String rolesKey = userName + ROLES_SUFFIX;
        if (configuration.containsKey(rolesKey)) {
            String roles = configuration.get(rolesKey);
            return roles.split(",");
        } else {
            return new String[0];
        }
    }

    private static class SampleIdentity implements Identity {
        private final String userName;
        private final Credential credential;

        private SampleIdentity(final String userName, final String password) {
            this.userName = userName;
            this.credential = new PasswordCredential(password.toCharArray());
        }

        public String getUserName() {
            return userName;
        }

        public Credential getCredential() {
            return credential;
        }
    }
}
As you can see from this implementation there is also an additional class being extended AbstractPlugIn - that is simply an abstract class that implements the AuthenticationPlugIn, AuthorizationPlugIn, and PlugInConfigurationSupport interfaces already. The properties that were defined in the configuration are passed in as a Map and importantly for this sample the plug-in adds itself to the shared state map.
The AuthorizationPlugIn
The example implementation of the authentication plug-in is as follows: -
public class DelegateAuthorizationPlugIn extends AbstractPlugIn {

    private AuthorizationPlugIn authorizationPlugIn;

    public void init(Map<String, String> configuration, Map<String, Object> sharedState) throws IOException {
        authorizationPlugIn = (AuthorizationPlugIn) sharedState.get(AuthorizationPlugIn.class.getName());
    }

    public String[] loadRoles(String userName, String realm) throws IOException {
        return authorizationPlugIn.loadRoles(userName, realm);
    }

}
This plug-in illustrates how two plug-ins can work together, by the AuthenticationPlugIn placing itself in the shared state map it is possible for the authorization plug-in to make use of it for the loadRoles implementation.
Another option to consider to achieve similar behaviour could be to provide an Identity implementation that also contains the roles and place this in the shared state map - the AuthorizationPlugIn can retrieve this and return the roles.
Forcing Plain Text Authentication
As mentioned earlier in this article if the ValidatePasswordCredential is going to be used then the authentication used at the transport level needs to be forced from Digest authentication to plain text authentication, this can be achieved by adding a mechanism attribute to the plug-in definition within the authentication element i.e.
  <authentication>
    <plug-in name="Sample" mechanism="PLAIN">
Example Configurations
This section of the document contains a couple of examples for the most common scenarios likely to be used with the security realms, please feel free to raise Jira issues requesting additional scenarios or if you have configured something not covered here please feel free to add your own examples - this document is editable after all ![]()
At the moment these examples are making use of the 'ManagementRealm' however the same can apply to the 'ApplicationRealm' or any custom realm you create for yourselves.
LDAP Authentication
The following example demonstrates an example configuration making use of Active Directory to verify the users username and password.
<management>
  <security-realms>
    <security-realm name="ManagementRealm">
      <authentication>
        <ldap connection="EC2" base-dn="CN=Users,DC=darranl,DC=jboss,DC=org">
          <username-filter attribute="sAMAccountName" />
        </ldap>
      </authentication>
    </security-realm>

  </security-realms>

  <outbound-connections>
    <ldap name="EC2" url="ldap://127.0.0.1:9797" search-dn="CN=wf8,CN=Users,DC=darranl,DC=jboss,DC=org" search-credential="password"/>
  </outbound-connections>

  ...

</management>
For simplicity the <local/> configuration has been removed from this example, however there it is fine to leave that in place for local authentication to remain possible.
Enable SSL
The first step is the creation of the key, by default this is going to be used for both the native management interface and the http management interface - to create the key we can use the keyTool, the following example will create a key valid for one year.
Open a terminal window in the folder {jboss.home}/standalone/configuration and enter the following command: -
keytool -genkey -alias server -keyalg RSA -keystore server.keystore -validity 365
Enter keystore password:
Re-enter new password:
In this example I choose 'keystore_password'.
What is your first and last name?
  [Unknown]:  localhost
Of all of the questions asked this is the most important and should match the host name that will be entered into the web browser to connect to the admin console.
Answer the remaining questions as you see fit and at the end for the purpose of this example I set the key password to 'key_password'.
The following example shows how this newly created keystore will be referenced to enable SSL.
<security-realm name="ManagementRealm">
  <server-identities>
    <ssl>
      <keystore path="server.keystore" relative-to="jboss.server.config.dir" keystore-password="keystore_password" alias="server" key-password="key_password" />
    </ssl>
  </server-identities>
  <authentication>
    ...
  </authentication>
</security-realm>
The contents of the <authentication /> have not been changed in this example so authentication still occurs using either the local mechanism or username/password authentication using Digest.
Add Client-Cert to SSL
To enable Client-Cert style authentication we just now need to add a <truststore /> element to the <authentication /> element referencing a trust store that has had the certificates or trusted clients imported.
<security-realm name="ManagementRealm">
  <server-identities>
    <ssl>
      <keystore path="server.keystore" relative-to="jboss.server.config.dir" keystore-password="keystore_password" alias="server" key-password="key_password" />
    </ssl>
  </server-identities>
  <authentication>
    <truststore path="server.truststore" relative-to="jboss.server.config.dir" keystore-password="truststore_password" />
    <local default-user="$local"/>
    <properties path="mgmt-users.properties" relative-to="jboss.server.config.dir"/>
  </authentication>
</security-realm>
In this scenario if Client-Cert authentication does not occur clients can fall back to use either the local mechanism or username/password authentication. To make Client-Cert based authentication mandatory just remove the <local /> and <properties /> elements.
JVM settings
Configuration of the JVM settings is different for a managed domain and a standalone server. In a managed domain, the domain controller components are responsible for starting and stoping server processes and hence determine the JVM settings. For a standalone server, it's the responsibility of the process that started the server (e.g. passing them as command line arguments).
Managed Domain
In a managed domain the JVM settings can be declared at different scopes: For a specific server group, for a host or for a particular server. If not declared, the settings are inherited from the parent scope. This allows you to customize or extend the JVM settings within every layer.
Let's take a look at the JVM declaration for a server group:
<server-groups>
       <server-group name="main-server-group" profile="default">
           <jvm name="default">
               <heap size="64m" max-size="512m"/>
           </jvm>
           <socket-binding-group ref="standard-sockets"/>
       </server-group>
       <server-group name="other-server-group" profile="default">
           <jvm name="default">
               <heap size="64m" max-size="512m"/>
           </jvm>
           <socket-binding-group ref="standard-sockets"/>
       </server-group>
</server-groups>
(See domain/configuration/domain.xml)
In this example the server group "main-server-group" declares a heap size of 64m and a maximum heap size of 512m. Any server that belongs to this group will inherit these settings. You can change these settings for the group as a whole, or a specific server or host:
<servers>
       <server name="server-one" group="main-server-group" auto-start="true">
           <jvm name="default"/>
       </server>
       <server name="server-two" group="main-server-group" auto-start="true">
           <jvm name="default">
               <heap size="64m" max-size="256m"/>
           </jvm>
           <socket-binding-group ref="standard-sockets" port-offset="150"/>
       </server>
       <server name="server-three" group="other-server-group" auto-start="false">
           <socket-binding-group ref="standard-sockets" port-offset="250"/>
       </server>
</servers>
(See domain/configuration/host.xml)
In this case, server-two, belongs to the main-server-group and inherits the JVM settings named default, but declares a lower maximum heap size.
[domain@localhost:9999 /] /host=local/server-config=server-two/jvm=default:read-resource
{
   "outcome" => "success",
   "result" => {
       "heap-size" => "64m",
       "max-heap-size" => "256m",
   }
}
Standalone Server
For a standalone sever you have to pass in the JVM settings either as command line arguments when executing the $JBOSS_HOME/bin/standalone.sh script, or by declaring them in $JBOSS_HOME/bin/standalone.conf. (For Windows users, the script to execute is %JBOSS_HOME%/bin/standalone.bat while the JVM settings can be declared in %JBOSS_HOME%/bin/standalone.conf.bat.)
Command line parameters
To start up a WildFly 8 managed domain, execute the $JBOSS_HOME/bin/domain.sh script. To start up a standalone server, execute the $JBOSS_HOME/bin/standalone.sh. With no arguments, the default configuration is used. You can override the default configuration by providing arguments on the command line, or in your calling script.
System properties
The standalone and the managed domain modes each use a default configuration which expects various files and writable directories to exist in standard locations. Each of these standard locations is associated with a system property, which has a default value. To override a system property, pass its new value using the standard jvm -Dkey=value options:
$JBOSS_HOME/bin/standalone.sh -Djboss.home.dir=some/location/WildFly/jboss-as \
    -Djboss.server.config.dir=some/location/WildFly/jboss-as/custom-standalone
This command starts up a standalone server instance using a non-standard AS home directory and a custom configuration directory. For specific information about system properties, refer to the definitions below.
Instead of passing the parameters directly, you can put them into a properties file, and pass the properties file to the script, as in the two examples below.
$JBOSS_HOME/bin/domain.sh --properties=/some/location/jboss.properties
$JBOSS_HOME/bin/domain.sh -P=/some/location/jboss.properties
The syntax for passing in parameters and properties files is the same regardless of whether you are running the domain.sh, standalone.sh, or the Microsoft Windows scriptsdomain.bat or standalone.bat.
The properties file is a standard Java property file containing key=value pairs:
jboss.home.dir=/some/location/WildFly/jboss-as
jboss.domain.config.dir=/some/location/WildFly/custom-domain
Standalone
|
Property name |
Usage |
Default value |
|
java.ext.dirs |
The JDK extension directory paths |
null |
|
jboss.home.dir |
The root directory of the WildFly 8 installation. |
Set by standalone.sh to $JBOSS_HOME |
|
jboss.server.base.dir |
The base directory for server content. |
jboss.home.dir/standalone |
|
jboss.server.config.dir |
The base configuration directory. |
jboss.server.base.dir/configuration |
|
jboss.server.data.dir |
The directory used for persistent data file storage. |
jboss.server.base.dir/data |
|
jboss.server.log.dir |
The directory containing the server.log file. |
jboss.server.base.dir/log |
|
jboss.server.temp.dir |
The directory used for temporary file storage. |
jboss.server.base.dir/tmp |
|
jboss.server.deploy.dir |
The directory used to store deployed content |
jboss.server.data.dir/content |
Managed Domain
|
Property name |
Usage |
Default value |
|
jboss.home.dir |
The root directory of the WildFly installation. |
Set by domain.sh to $JBOSS_HOME |
|
jboss.domain.base.dir |
The base directory for domain content. |
jboss.home.dir/domain |
|
jboss.domain.config.dir |
The base configuration directory |
jboss.domain.base.dir/configuration |
|
jboss.domain.data.dir |
The directory used for persistent data file storage. |
jboss.domain.base.dir/data |
|
jboss.domain.log.dir |
The directory containing the host-controller.log and process-controller.log files |
jboss.domain.base.dir/log |
|
jboss.domain.temp.dir |
The directory used for temporary file storage |
jboss.domain.base.dir/tmp |
|
jboss.domain.deployment.dir |
The directory used to store deployed content |
jboss.domain.base.dir/content |
|
jboss.domain.servers.dir |
The directory containing the output for the managed server instances |
jboss.domain.base.dir/servers |
Other command line parameters
The first acceptable format for command line arguments to the WildFly launch scripts is
--name=value
For example:
$JBOSS_HOME/bin/standalone.sh --server-config=standalone-ha.xml
If the parameter name is a single character, it is prefixed by a single '-' instead of two. Some parameters have both a long and short option.
-x=value
For example:
$JBOSS_HOME/bin/standalone.sh -P=/some/location/jboss.properties
For some command line arguments frequently used in previous major releases of WildFly, replacing the "=" in the above examples with a space is supported, for compatibility.
-b 192.168.100.10
If possible, use the -x=value syntax. New parameters will always support this syntax.
The sections below describe the command line parameter names that are available in standalone and domain mode.
Standalone
|
Name |
Default if absent |
Value |
|
--server-config |
jboss.server.config.dir/standalone.xml |
A relative path which is interpreted to be relative to jboss.server.config.dir. |
|
--read-only-server-config |
- |
A relative path which is interpreted to be relative to jboss.server.config.dir. This is similar to --server-config but it does not overwrite the file used when the management model is changed. However a full versioned history is maintained of the file. |
Managed Domain
|
Name |
Default if absent |
Value |
|
--domain-config |
jboss.domain.config.dir/domain.xml |
A relative path which is interpreted to be relative to jboss.domain.config.dir. |
|
--read-only-domain-config |
- |
A relative path which is interpreted to be relative to jboss.domain.config.dir. This is similar to --domain-config but it does not overwrite the file used when the management model is changed. However a full versioned history is maintained of the file. |
|
--host-config |
jboss.domain.config.dir/host.xml |
A relative path which is interpreted to be relative to jboss.domain.config.dir. |
|
--read-only-host-config |
- |
A relative path which is interpreted to be relative to jboss.domain.config.dir. This is similar to --host-config but it does not overwrite the file used when the management model is changed. However a full versioned history is maintained of the file. |
The following parameters take no value and are only usable on slave host controllers (i.e. hosts configured to connect to a remote domain controller.)
|
Name |
Function |
|
--backup |
Causes the slave host controller to create and maintain a local copy of the domain configuration file |
|
--cached-dc |
If the slave host controller is unable to contact the master domain controller to get its configuration at boot, boot from a local copy previously created using --backup. The slave host controller will not be able make any modifications to the domain configuration, but it will be able to launch servers. |
Common parameters
These parameters apply in both standalone or managed domain mode:
|
Name |
Function |
|
-b=<value> |
Sets system property jboss.bind.address to <value>. See Controlling the Bind Address with -b for further details. |
|
-b<name>=<value> |
Sets system property jboss.bind.address.<name> to <value> where name can vary. See Controlling the Bind Address with -b for further details. |
|
-u=<value> |
Sets system property jboss.default.multicast.address to <value>. See Controlling the Default Multicast Address with -u for further details. |
|
--version |
Prints the version of WildFly to standard output and exits the JVM. |
|
--help |
Prints a help message explaining the options and exits the JVM. |
Controlling the Bind Address with -b
WildFly binds sockets to the IP addresses and interfaces contained in the <interfaces> elements in standalone.xml, domain.xml and host.xml. (See Interfaces and Socket Bindings for further information on these elements.) The standard configurations that ship with WildFly includes two interface configurations:
<interfaces>
    <interface name="management">
        <inet-address value="${jboss.bind.address.management:127.0.0.1}"/>
    </interface>
    <interface name="public">
       <inet-address value="${jboss.bind.address:127.0.0.1}"/>
    </interface>
</interfaces>
Those configurations use the values of system properties jboss.bind.address.management and jboss.bind.address if they are set. If they are not set, 127.0.0.1 is used for each value.
As noted in Common Parameters, the AS supports the -b and -b<name> command line switches. The only function of these switches is to set system properties jboss.bind.address and jboss.bind.address.<name> respectively. However, because of the way the standard WildFly configuration files are set up, using the -b switches can indirectly control how the AS binds sockets.
If your interface configurations match those shown above, using this as your launch command causes all sockets associated with interface named "public" to be bound to 192.168.100.10.
$JBOSS_HOME/bin/standalone.sh -b=192.168.100.10
In the standard config files, public interfaces are those not associated with server management. Public interfaces handle normal end-user requests.
Interface names
The interface named "public" is not inherently special. It is provided as a convenience. You can name your interfaces to suit your environment.
To bind the public interfaces to all IPv4 addresses (the IPv4 wildcard address), use the following syntax:
$JBOSS_HOME/bin/standalone.sh -b=0.0.0.0
You can also bind the management interfaces, as follows:
$JBOSS_HOME/bin/standalone.sh -bmanagement=192.168.100.10
In the standard config files, management interfaces are those sockets associated with server management, such as the socket used by the CLI, the HTTP socket used by the admin console, and the JMX connector socket.
Be Careful
The -b switch only controls the interface bindings because the standard config files that ship with WildFly sets things up that way. If you change the <interfaces> section in your configuration to ignore the system properties controlled by -b, then setting -b in your launch command will have no effect.
For example, this perfectly valid setting for the "public" interface causes -b to have no effect on the "public" interface:
<interface name="public">
   <nic name="eth0"/>
</interface>
The key point is the contents of the configuration files determine the configuration. Settings like -b are not overrides of the configuration files. They only provide a shorter syntax for setting a system properties that may or may not be referenced in the configuration files. They are provided as a convenience, and you can choose to modify your configuration to ignore them.
Controlling the Default Multicast Address with -u
WildFly 8 may use multicast communication for some services, particularly those involving high availability clustering. The multicast addresses and ports used are configured using the socket-binding elements in standalone.xml and domain.xml. (See Socket Bindings for further information on these elements.) The standard HA configurations that ship with WildFly include two socket binding configurations that use a default multicast address:
<socket-binding name="jgroups-mping" port="0" multicast-address="${jboss.default.multicast.address:230.0.0.4}" multicast-port="45700"/>
<socket-binding name="jgroups-udp" port="55200" multicast-address="${jboss.default.multicast.address:230.0.0.4}" multicast-port="45688"/>
Those configurations use the values of system property jboss.default.multicast.address if it is set. If it is not set, 230.0.0.4 is used for each value. (The configuration may include other socket bindings for multicast-based services that are not meant to use the default multicast address; e.g. a binding the mod-cluster services use to communicate on a separate address/port with Apache httpd servers.)
As noted in Common Parameters, the AS supports the -u command line switch. The only function of this switch is to set system property jboss.default.multicast.address. However, because of the way the standard AS configuration files are set up, using the -u switches can indirectly control how the AS uses multicast.
If your socket binding configurations match those shown above, using this as your launch command causes the service using those sockets configurations to be communicate over multicast address 230.0.1.2.
$JBOSS_HOME/bin/standalone.sh -u=230.0.1.2
Be Careful
As with the -b switch, the -u switch only controls the multicast address used because the standard config files that ship with WildFly 8 sets things up that way. If you change the <socket-binding> sections in your configuration to ignore the system properties controlled by -u, then setting -u in your launch command will have no effect.
Audit logging
WildFly comes with audit logging built in for management operations affecting the management model. By default it is turned off. The information is output as JSON records.
The default configuration of audit logging in standalone.xml looks as follows:
    <management>
        <security-realms>
...
        </security-realms>
        <audit-log>
            <formatters>
                <json-formatter name="json-formatter"/>
            </formatters>
            <handlers>
                <file-handler name="file" formatter="json-formatter" path="audit-log.log" relative-to="jboss.server.data.dir"/>
            </handlers>
            <logger log-boot="true" log-read-only="true" enabled="false">
                <handlers>
                    <handler name="file"/>
                </handlers>
            </logger>
        </audit-log>
...
Looking at this via the CLI it looks like
[standalone@localhost:9990 /] /core-service=management/access=audit:read-resource(recursive=true)
{
    "outcome" => "success",
    "result" => {
        "file-handler" => {"file" => {
            "formatter" => "json-formatter",
            "max-failure-count" => 10,
            "path" => "audit-log.log",
            "relative-to" => "jboss.server.data.dir"
        }},
        "json-formatter" => {"json-formatter" => {
            "compact" => false,
            "date-format" => "yyyy-MM-dd HH:mm:ss",
            "date-separator" => " - ",
            "escape-control-characters" => false,
            "escape-new-line" => false,
            "include-date" => true
        }},
        "logger" => {"audit-log" => {
            "enabled" => false,
            "log-boot" => true,
            "log-read-only" => false,
            "handler" => {"file" => {}}
        }},
        "syslog-handler" => undefined
    }
}
The audit logging subsystem has a lot of internal dependencies, and it logs operations changing, enabling and disabling its components. When configuring or changing things at runtime it is a good idea to make these changes as part of a CLI batch. For example if you are adding a syslog handler you need to add the handler and its information as one step. Similarly if you are using a file handler, and want to change its path and relative-to attributes, that needs to happen as one step.
JSON Formatter
The first thing that needs configuring is the formatter, we currently support outputting log records as JSON. You can define several formatters, for use with different handlers. A log record has the following format, and it is the formatter's job to format the data presented:
2013-08-12 11:01:12 - {
    "type" : "core",
    "r/o" : false,
    "booting" : false,
    "version" : "8.0.0.Alpha4",
    "user" : "$local",
    "domainUUID" : null,
    "access" : "NATIVE",
    "remote-address" : "127.0.0.1/127.0.0.1",
    "success" : true,
    "ops" : [JMX|WFLY8:JMX subsystem configuration],
        "operation" : "write-attribute",
        "name" : "enabled",
        "value" : true,
        "operation-headers" : {"caller-type" : "user"}
    }]
}
It includes an optional timestamp and then the following information in the json record
|
Field name |
Description |
|
type |
This can have the values core, meaning it is a management operation, or jmx meaning it comes from the jmx subsystem (see the jmx subsystem for configuration of the jmx subsystem's audit logging) |
|
r/o |
true if the operation does not change the management model, false otherwise |
|
booting |
true if the operation was executed during the bootup process, false if it was executed once the server is up and running |
|
version |
The version number of the WildFly instance |
|
user |
The username of the authenticated user. In this case the operation has been logged via the CLI on the same machine as the running server, so the special $local user is used |
|
domainUUID |
An ID to link together all operations as they are propagated from the Doman Controller to it servers, slave Host Controllers, and slave Host Controller servers |
|
access |
This can have one of the following values: |
|
remote-address |
The address of the client executing this operation |
|
success |
true if the operation succeeded, false if it was rolled back |
|
ops |
The operations being executed. This is a list of the operations serialized to JSON. At boot this will be all the operations resulting from parsing the xml. Once booted the list will typically just contain a single entry |
The json formatter resource has the following attributes:
|
Attribute |
Description |
|
include-date |
Boolan toggling whether or not to include the timestamp in the formatted log records |
|
date-separator |
A string containing characters to separate the date and the rest of the formatted log message. Will be ignored if include-date=false |
|
date-format |
The date format to use for the timestamp as understood by java.text.SimpleDateFormat. Will be ignored if include-date=false |
|
compact |
If true will format the JSON on one line. There may still be values containing new lines, so if having the whole record on one line is important, set escape-new-line or escape-control-characters to true |
|
escape-control-characters |
If true it will escape all control characters (ascii entries with a decimal value < 32) with the ascii code in octal, e.g. a new line becomes '#012'. If this is true, it will override escape-new-line=false |
|
escape-new-line |
If true it will escape all new lines with the ascii code in octal, e.g. "#012". |
Handlers
A handler is responsible for taking the formatted data and logging it to a location. There are currently two types of handlers, File and Syslog. You can configure several of each type of handler and use them to log information.
File handler
The file handlers log the audit log records to a file on the server. The attributes for the file handler are
|
Attribute |
Description |
Read Only |
|
formatter |
The name of a JSON formatter to use to format the log records |
false |
|
path |
The path of the audit log file |
false |
|
relative-to |
The name of another previously named path, or of one of the standard paths provided by the system. If relative-to is provided, the value of the path attribute is treated as relative to the path specified by this attribute |
false |
|
failure-count |
The number of logging failures since the handler was initialized |
true |
|
max-failure-count |
The maximum number of logging failures before disabling this handler |
false |
|
disabled-due-to-failure |
true if this handler was disabled due to logging failures |
true |
In our standard configuration path=audit-log.log and relative-to=jboss.server.data.dir, typically this will be $JBOSS_HOME/standalone/data/audit-log.log
Syslog handler
The default configuration does not have syslog audit logging set up. Syslog is a better choice for audit logging since you can log to a remote syslog server, and secure the authentication to happen over TLS with client certificate authentication. Syslog servers vary a lot in their capabilities so not all settings in this section apply to all syslog servers. We have tested with rsyslog.
The address for the syslog handler is /core-service=management/access=audit/syslog-handler=* and just like file handlers you can add as many syslog entries as you like. The syslog handler resources reference the main RFC's for syslog a fair bit, for reference they can be found at:
*http://www.ietf.org/rfc/rfc3164.txt
*http://www.ietf.org/rfc/rfc5424.txt
*http://www.ietf.org/rfc/rfc6587.txt
The syslog handler resource has the following attributes:
|
formatter |
The name of a JSON formatter to use to format the log records |
false |
|
failure-count |
The number of logging failures since the handler was initialized |
true |
|
max-failure-count |
The maximum number of logging failures before disabling this handler |
false |
|
disabled-due-to-failure |
true if this handler was disabled due to logging failures |
true |
|
syslog-format |
Whether to set the syslog format to the one specified in RFC-5424 or RFC-3164 |
false |
|
max-length |
The maximum length in bytes a log message, including the header, is allowed to be. If undefined, it will default to 1024 bytes if the syslog-format is RFC3164, or 2048 bytes if the syslog-format is RFC5424. |
false |
|
truncate |
Whether or not a message, including the header, should truncate the message if the length in bytes is greater than the maximum length. If set to false messages will be split and sent with the same header values |
false |
When adding a syslog handler you also need to add the protocol it will use to communicate with the syslog server. The valid choices for protocol are UDP,TCP and TLS. The protocol must be added at the same time as you add the syslog handler, or it will fail. Also, you can only add one protocol for the handler.
UDP
Configures the handler to use UDP to communicate with the syslog server. The address of the UDP resource is /core-service=management/access=audit/syslog-handler=*/protocol=udp. The attributes of the UDP resource are:
|
Attribute |
Description |
|
host |
The host of the syslog server for the udp requests |
|
port |
The port of the syslog server listening for the udp requests |
TCP
Configures the handler to use TCP to communicate with the syslog server. The address of the TCP resource is /core-service=management/access=audit/syslog-handler=*/protocol=tcp. The attributes of the TCP resource are:
|
Attribute |
Description |
|
host |
The host of the syslog server for the tcp requests |
|
port |
The port of the syslog server listening for the tcp requests |
|
message-transfer |
The message transfer setting as described in section 3.4 of RFC-6587. This can either be OCTET_COUNTING as described in section 3.4.1 of RFC-6587, or NON_TRANSPARENT_FRAMING as described in section 3.4.1 of RFC-6587 |
TLS
Configures the handler to use TLC to communicate securely with the syslog server. The address of the TLS resource is /core-service=management/access=audit/syslog-handler=*/protocol=tls. The attributes of the TLS resource are the same as for TCP:
|
Attribute |
Description |
|
host |
The host of the syslog server for the tls requests |
|
port |
The port of the syslog server listening for the tls requests |
|
message-transfer |
The message transfer setting as described in section 3.4 of RFC-6587. This can either be OCTET_COUNTING as described in section 3.4.1 of RFC-6587, or NON_TRANSPARENT_FRAMING as described in section 3.4.1 of RFC-6587 |
If the syslog server's TLS certificate is not signed by a certificate signing authority, you will need to set up a truststore to trust the certificate. The resource for the trust store is a child of the TLS resource, and the full address is /core-service=management/access=audit/syslog-handler=*/protocol=tls/authentication=truststore. The attributes of the truststore resource are:
|
Attribute |
Description |
|
keystore-password |
The password for the truststore |
|
keystore-path |
The path of the truststore |
|
keystore-relative-to |
The name of another previously named path, or of one of the standard paths provided by the system. If keystore-relative-to is provided, the value of the keystore-path attribute is treated as relative to the path specified by this attribute |
TLS with Client certificate authentication.
If you have set up the syslog server to require client certificate authentication, when creating your handler you will also need to set up a client certificate store containing the certificate to be presented to the syslog server. The address of the client certificate store resource is /core-service=management/access=audit/syslog-handler=*/protocol=tls/authentication=client-certificate-store and its attributes are:
|
Attribute |
Description |
|
keystore-password |
The password for the keystore |
|
key-password |
The password for the keystore key |
|
keystore-path |
The path of the keystore |
|
keystore-relative-to |
The name of another previously named path, or of one of the standard paths provided by the system. If keystore-relative-to is provided, the value of the keystore-path attribute is treated as relative to the path specified by this attribute |
Logger configuration
The final part that needs configuring is the logger for the management operations. This references one or more handlers and is configured at /core-service=management/access=audit/logger=audit-log. The attributes for this resource are:
|
Attribute |
Description |
|
enabled |
true to enable logging of the management operations |
|
log-boot |
true to log the management operations when booting the server, false otherwise |
|
log-read-only |
If true all operations will be audit logged, if false only operations that change the model will be logged |
Then which handlers are used to log the management operations are configured as handler=* children of the logger.
Domain Mode (host specific configuration)
In domain mode audit logging is configured for each host in its host.xml file. This means that when connecting to the DC, the configuration of the audit logging is under the host's entry, e.g. here is the default configuration:
[domain@localhost:9990 /] /host=master/core-service=management/access=audit:read-resource(recursive=true)
{
    "outcome" => "success",
    "result" => {
        "file-handler" => {
            "host-file" => {
                "formatter" => "json-formatter",
                "max-failure-count" => 10,
                "path" => "audit-log.log",
                "relative-to" => "jboss.domain.data.dir"
            },
            "server-file" => {
                "formatter" => "json-formatter",
                "max-failure-count" => 10,
                "path" => "audit-log.log",
                "relative-to" => "jboss.server.data.dir"
            }
        },
        "json-formatter" => {"json-formatter" => {
            "compact" => false,
            "date-format" => "yyyy-MM-dd HH:mm:ss",
            "date-separator" => " - ",
            "escape-control-characters" => false,
            "escape-new-line" => false,
            "include-date" => true
        }},
        "logger" => {"audit-log" => {
            "enabled" => false,
            "log-boot" => true,
            "log-read-only" => false,
            "handler" => {"host-file" => {}}
        }},
        "server-logger" => {"audit-log" => {
            "enabled" => false,
            "log-boot" => true,
            "log-read-only" => false,
            "handler" => {"server-file" => {}}
        }},
        "syslog-handler" => undefined
    }
}
We now have two file handlers, one called host-file used to configure the file to log management operations on the host, and one called server-file used to log management operations executed on the servers. Then logger=audit-log is used to configure the logger for the host controller, referencing the host-file handler. server-logger=audit-log is used to configure the logger for the managed servers, referencing the server-file handler. The attributes for server-logger=audit-log are the same as for server-logger=audit-log in the previous section. Having the host controller and server loggers configured independently means we can control audit logging for managed servers and the host controller independently.
Subsystem configuration
The following chapters will focus on the high level management use cases that are available through the CLI and the web interface. For a detailed description of each subsystem configuration property, please consult the respective component reference.
Schema Location
The configuration schemas can found in $JBOSS_HOME/docs/schema.
EE Subsystem Configuration
Overview
The EE subsystem provides common functionality in the Java EE platform, such as the EE Concurrency Utilities (JSR 236) and @Resource injection. The subsystem is also responsible for managing the lifecycle of Java EE application's deployments, that is, .ear files.
The EE subsystem configuration may be used to:
-
customise the deployment of Java EE applications
-
create EE Concurrency Utilities instances
-
define the default bindings
The subsystem name is ee and this document covers EE subsystem version 2.0, which XML namespace within WildFly XML configurations is urn:jboss:domain:ee:2.0. The path for the subsystem's XML schema, within WildFly's distribution, is docs/schema/jboss-as-ee_2_0.xsd.
Subsystem XML configuration example with all elements and attributes specified:
<subsystem xmlns="urn:jboss:domain:ee:2.0" >
    <global-modules>
        <module name="org.jboss.logging"
                slot="main"/>
        <module name="org.apache.log4j"
                annotations="true"
                meta-inf="true"
                services="false" />
    </global-modules>
    <ear-subdeployments-isolated>true</ear-subdeployments-isolated>
    <spec-descriptor-property-replacement>false</spec-descriptor-property-replacement>
    <jboss-descriptor-property-replacement>false</jboss-descriptor-property-replacement>
    <annotation-property-replacement>false</annotation-property-replacement>
    <concurrent>
        <context-services>
            <context-service
                    name="default"
                    jndi-name="java:jboss/ee/concurrency/context/default"
                    use-transaction-setup-provider="true" />
        </context-services>
        <managed-thread-factories>
            <managed-thread-factory
                    name="default"
                    jndi-name="java:jboss/ee/concurrency/factory/default"
                    context-service="default"
                    priority="1" />
        </managed-thread-factories>
        <managed-executor-services>
            <managed-executor-service
                    name="default"
                    jndi-name="java:jboss/ee/concurrency/executor/default"
                    context-service="default"
                    thread-factory="default"
                    hung-task-threshold="60000"
                    core-threads="5"
                    max-threads="25"
                    keepalive-time="5000"
                    queue-length="1000000"
                    reject-policy="RETRY_ABORT" />
        </managed-executor-services>
        <managed-scheduled-executor-services>
            <managed-scheduled-executor-service
                    name="default"
                    jndi-name="java:jboss/ee/concurrency/scheduler/default"
                    context-service="default"
                    thread-factory="default"
                    hung-task-threshold="60000"
                    core-threads="5"
                    keepalive-time="5000"
                    reject-policy="RETRY_ABORT" />
        </managed-scheduled-executor-services>
    </concurrent>
    <default-bindings
            context-service="java:jboss/ee/concurrency/context/default"
            datasource="java:jboss/datasources/ExampleDS"
            jms-connection-factory="java:jboss/DefaultJMSConnectionFactory"
            managed-executor-service="java:jboss/ee/concurrency/executor/default"
            managed-scheduled-executor-service="java:jboss/ee/concurrency/scheduler/default"
            managed-thread-factory="java:jboss/ee/concurrency/factory/default" />
</subsystem>
Java EE Application Deployment
The EE subsystem configuration allows the customisation of the deployment behaviour for Java EE Applications.
Global Modules
Global modules is a set of JBoss Modules that will be added as dependencies to the JBoss Module of every Java EE deployment. Such dependencies allows Java EE deployments to see the classes exported by the global modules.
Each global module is defined through the module resource, an example of its XML configuration:
  <global-modules>
    <module name="org.jboss.logging" slot="main"/>
    <module name="org.apache.log4j" annotations="true" meta-inf="true" services="false" />
  </global-modules>
The only mandatory attribute is the JBoss Module name, the slot attribute defaults to main, and both define the JBoss Module ID to reference.
The optional annotations attribute, which defaults to false, indicates if a pre-computed annotation index should be imported from META-INF/jandex.idx
The optional services attribute indicates if any services exposed in META-INF/services should be made available to the deployments class loader, and defaults to false.
The optional meta-inf attribute, which defaults to true, indicates if the Module's META-INF path should be available to the deployment's class loader.
EAR Subdeployments Isolation
A flag indicating whether each of the subdeployments within a .ear can access classes belonging to another subdeployment within the same .ear. The default value is false, which allows the subdeployments to see classes belonging to other subdeployments within the .ear.
<ear-subdeployments-isolated>true</ear-subdeployments-isolated>
For example:
myapp.ear
|
|--- web.war
|
|--- ejb1.jar
|
|--- ejb2.jar
If the ear-subdeployments-isolated is set to false, then the classes in web.war can access classes belonging to ejb1.jar and ejb2.jar. Similarly, classes from ejb1.jar can access classes from ejb2.jar (and vice-versa).
This flag has no effect on the isolated classloader of the .war file(s), i.e. irrespective of whether this flag is set to true or false, the .war within a .ear will have a isolated classloader, and other subdeployments within that .ear will not be able to access classes from that .war. This is as per spec.
Property Replacement
The EE subsystem configuration includes flags to configure whether system property replacement will be done on XML descriptors and Java Annotations, included in Java EE deployments.
System properties etc are resolved in the security context of the application server itself, not the deployment that contains the file. This means that if you are running with a security manager and enable this property, a deployment can potentially access system properties or environment entries that the security manager would have otherwise prevented.
Spec Descriptor Property Replacement
Flag indicating whether system property replacement will be performed on standard Java EE XML descriptors. This defaults to true, however it is disabled in the default configurations.
<spec-descriptor-property-replacement>false</spec-descriptor-property-replacement>
JBoss Descriptor Property Replacement
Flag indicating whether system property replacement will be performed on WildFly proprietary XML descriptors, such as jboss-app.xml. This defaults to true.
<jboss-descriptor-property-replacement>false</jboss-descriptor-property-replacement>
Annotation Property Replacement
Flag indicating whether system property replacement will be performed on Java annotations. The default value is false.
<annotation-property-replacement>false</annotation-property-replacement>
EE Concurrency Utilities
EE Concurrency Utilities (JSR 236) were introduced with Java EE 7, to ease the task of writing multithreaded Java EE applications. Instances of these utilities are managed by WildFly, and the related configuration provided by the EE subsystem.
Context Services
The Context Service is a concurrency utility which creates contextual proxies from existent objects. WildFly Context Services are also used to propagate the context from a Java EE application invocation thread, to the threads internally used by the other EE Concurrency Utilities. Context Service instances may be created using the subsystem XML configuration:
  <context-services>
    <context-service
	name="default"
	jndi-name="java:jboss/ee/concurrency/context/default"
	use-transaction-setup-provider="true" />
  </context-services>
The name attribute is mandatory, and it's value should be a unique name within all Context Services.
The jndi-name attribute is also mandatory, and defines where in the JNDI the Context Service should be placed.
The optional use-trasaction-setup-provider attribute indicates if the contextual proxies built by the Context Service should suspend transactions in context, when invoking the proxy objects, and its value defaults to true.
Management clients, such as the WildFly CLI, may also be used to configure Context Service instances. An example to add and remove one named other:
/subsystem=ee/context-service=other:add(jndi-name=java\:jboss\/ee\/concurrency\/other)
/subsystem=ee/context-service=other:remove
Managed Thread Factories
The Managed Thread Factory allows Java EE applications to create new threads. WildFly Managed Thread Factory instances may also, optionally, use a Context Service instance to propagate the Java EE application thread’s context to the new threads. Instance creation is done through the EE subsystem, by editing the subsystem XML configuration:
  <managed-thread-factories>
    <managed-thread-factory
	name="default"
	jndi-name="java:jboss/ee/concurrency/factory/default"
	context-service="default"
	priority="1" />
  </managed-thread-factories>
The name attribute is mandatory, and it's value should be a unique name within all Managed Thread Factories.
The jndi-name attribute is also mandatory, and defines where in the JNDI the Managed Thread Factory should be placed.
The optional context-service references an existent Context Service by its name. If specified then thread created by the factory will propagate the invocation context, present when creating the thread.
The optional priority indicates the priority for new threads created by the factory, and defaults to 5.
Management clients, such as the WildFly CLI, may also be used to configure Managed Thread Factory instances. An example to add and remove one named other:
/subsystem=ee/managed-thread-factory=other:add(jndi-name=java\:jboss\/ee\/factory\/other)
/subsystem=ee/managed-thread-factory=other:remove
Managed Executor Services
The Managed Executor Service is the Java EE adaptation of Java SE Executor Service, providing to Java EE applications the functionality of asynchronous task execution. WildFly is responsible to manage the lifecycle of Managed Executor Service instances, which are specified through the EE subsystem XML configuration:
  <managed-executor-services>
    <managed-executor-service
	name="default"
	jndi-name="java:jboss/ee/concurrency/executor/default"
	context-service="default"
	thread-factory="default"
	hung-task-threshold="60000"
	core-threads="5"
	max-threads="25"
	keepalive-time="5000"
	queue-length="1000000"
	reject-policy="RETRY_ABORT" />
  </managed-executor-services>
The name attribute is mandatory, and it's value should be a unique name within all Managed Executor Services.
The jndi-name attribute is also mandatory, and defines where in the JNDI the Managed Executor Service should be placed.
The optional context-service references an existent Context Service by its name. If specified then the referenced Context Service will capture the invocation context present when submitting a task to the executor, which will then be used when executing the task.
The optional thread-factory references an existent Managed Thread Factory by its name, to handle the creation of internal threads. If not specified then a Managed Thread Factory with default configuration will be created and used internally.
The mandatory core-threads provides the number of threads to keep in the executor's pool, even if they are idle. A value of 0 means there is no limit.
The optional queue-length indicates the number of tasks that can be stored in the input queue. The default value is 0, which means the queue capacity is unlimited.
The executor’s task queue is based on the values of the attributes core-threads and queue-length:
-
If queue-length is 0, or queue-length is Integer.MAX_VALUE (2147483647) and core-threads is 0, direct handoff queuing strategy will be used and a synchronous queue will be created.
-
If queue-length is Integer.MAX_VALUE but core-threads is not 0, an unbounded queue will be used.
-
For any other valid value for queue-length, a bounded queue wil be created.
The optional hung-task-threshold defines a threshold value, in milliseconds, to hung a possibly blocked task. A value of 0 will never hung a task, and is the default.
The optional long-running-tasks is a hint to optimize the execution of long running tasks, and defaults to false.
The optional max-threads defines the the maximum number of threads used by the executor, which defaults to Integer.MAX_VALUE (2147483647).
The optional keepalive-time defines the time, in milliseconds, that an internal thread may be idle. The attribute default value is 60000.
The optional reject-policy defines the policy to use when a task is rejected by the executor. The attribute value may be the default ABORT, which means an exception should be thrown, or RETRY_ABORT, which means the executor will try to submit it once more, before throwing an exception.
Management clients, such as the WildFly CLI, may also be used to configure Managed Executor Service instances. An example to add and remove one named other:
/subsystem=ee/managed-executor-service=other:add(jndi-name=java\:jboss\/ee\/executor\/other, core-threads=2)
/subsystem=ee/managed-executor-service=other:remove
Managed Scheduled Executor Services
The Managed Scheduled Executor Service is the Java EE adaptation of Java SE Scheduled Executor Service, providing to Java EE applications the functionality of scheduling task execution. WildFly is responsible to manage the lifecycle of Managed Scheduled Executor Service instances, which are specified through the EE subsystem XML configuration:
  <managed-scheduled-executor-services>
    <managed-scheduled-executor-service
	name="default"
	jndi-name="java:jboss/ee/concurrency/scheduler/default"
	context-service="default"
	thread-factory="default"
	hung-task-threshold="60000"
	core-threads="5"
	keepalive-time="5000"
	reject-policy="RETRY_ABORT" />
  </managed-scheduled-executor-services>
The name attribute is mandatory, and it's value should be a unique name within all Managed Scheduled Executor Services.
The jndi-name attribute is also mandatory, and defines where in the JNDI the Managed Scheduled Executor Service should be placed.
The optional context-service references an existent Context Service by its name. If specified then the referenced Context Service will capture the invocation context present when submitting a task to the executor, which will then be used when executing the task.
The optional thread-factory references an existent Managed Thread Factory by its name, to handle the creation of internal threads. If not specified then a Managed Thread Factory with default configuration will be created and used internally.
The mandatory core-threads provides the number of threads to keep in the executor's pool, even if they are idle. A value of 0 means there is no limit.
The optional hung-task-threshold defines a threshold value, in milliseconds, to hung a possibly blocked task. A value of 0 will never hung a task, and is the default.
The optional long-running-tasks is a hint to optimize the execution of long running tasks, and defaults to false.
The optional keepalive-time defines the time, in milliseconds, that an internal thread may be idle. The attribute default value is 60000.
The optional reject-policy defines the policy to use when a task is rejected by the executor. The attribute value may be the default ABORT, which means an exception should be thrown, orRETRY_ABORT, which means the executor will try to submit it once more, before throwing an exception.
Management clients, such as the WildFly CLI, may also be used to configure Managed Scheduled Executor Service instances. An example to add and remove one named other:
/subsystem=ee/managed-scheduled-executor-service=other:add(jndi-name=java\:jboss\/ee\/scheduler\/other, core-threads=2)
/subsystem=ee/managed-scheduled-executor-service=other:remove
Default EE Bindings
The Java EE Specification mandates the existence of a default instance for each of the following resources:
-
Context Service
-
Datasource
-
JMS Connection Factory
-
Managed Executor Service
-
Managed Scheduled Executor Service
-
Managed Thread Factory
The EE subsystem looks up the default instances from JNDI, using the names in the default bindings configuration, before placing those in the standard JNDI names, such as java:comp/DefaultManagedExecutorService:
  <default-bindings
	context-service="java:jboss/ee/concurrency/context/default"
	datasource="java:jboss/datasources/ExampleDS"
	jms-connection-factory="java:jboss/DefaultJMSConnectionFactory"
	managed-executor-service="java:jboss/ee/concurrency/executor/default"
	managed-scheduled-executor-service="java:jboss/ee/concurrency/scheduler/default"
	managed-thread-factory="java:jboss/ee/concurrency/factory/default" />
The default bindings are optional, if the jndi name for a default binding is not configured then the related resource will not be available to Java EE applications.
Data sources
Datasources are configured through the datasource subsystem. Declaring a new datasource consists of two separate steps: You would need to provide a JDBC driver and define a datasource that references the driver you installed.
JDBC Driver Installation
The recommended way to install a JDBC driver into WildFly 8 is to deploy it as a regular JAR deployment. The reason for this is that when you run WildFly 8 in domain mode, deployments are automatically propagated to all servers to which the deployment applies; thus distribution of the driver JAR is one less thing for you to worry about!
Any JDBC 4-compliant driver will automatically be recognized and installed into the system by name and version. A JDBC JAR is identified using the Java service provider mechanism. Such JARs will contain a text a file named META-INF/services/java.sql.Driver, which contains the name of the class(es) of the Drivers which exist in that JAR. If your JDBC driver JAR is not JDBC 4-compliant, it can be made deployable in one of a few ways.
Modify the JAR
The most straightforward solution is to simply modify the JAR and add the missing file. You can do this from your command shell by:
-
Change to, or create, an empty temporary directory.
-
Create a META-INF subdirectory.
-
Create a META-INF/services subdirectory.
-
Create a META-INF/services/java.sql.Driver file which contains one line - the fully-qualified class name of the JDBC driver.
-
Use the jar command-line tool to update the JAR like this:
jar \-uf jdbc-driver.jar META-INF/services/java.sql.Driver
For a detailed explanation how to deploy JDBC 4 compliant driver jar, please refer to the chapter "Application Deployment".
Datasource Definitions
The datasource itself is defined within the subsystem datasources:
<subsystem xmlns="urn:jboss:domain:datasources:1.0">
    <datasources>
        <datasource jndi-name="java:jboss/datasources/ExampleDS" pool-name="ExampleDS">
            <connection-url>jdbc:h2:mem:test;DB_CLOSE_DELAY=-1</connection-url>
            <driver>h2</driver>
            <pool>
                <min-pool-size>10</min-pool-size>
                <max-pool-size>20</max-pool-size>
                <prefill>true</prefill>
            </pool>
            <security>
                <user-name>sa</user-name>
                <password>sa</password>
            </security>
        </datasource>
        <xa-datasource jndi-name="java:jboss/datasources/ExampleXADS" pool-name="ExampleXADS">
           <driver>h2</driver>
           <xa-datasource-property name="URL">jdbc:h2:mem:test</xa-datasource-property>
           <xa-pool>
                <min-pool-size>10</min-pool-size>
                <max-pool-size>20</max-pool-size>
                <prefill>true</prefill>
           </xa-pool>
           <security>
                <user-name>sa</user-name>
                <password>sa</password>
           </security>
        </xa-datasource>
        <drivers>
            <driver name="h2" module="com.h2database.h2">
                <xa-datasource-class>org.h2.jdbcx.JdbcDataSource</xa-datasource-class>
            </driver>
        </drivers>
  </datasources>

</subsystem>
(See standalone/configuration/standalone.xml)
As you can see the datasource references a driver by it's logical name.
You can easily query the same information through the CLI:
[standalone@localhost:9999 /] /subsystem=datasources:read-resource(recursive=true)
{
    "outcome" => "success",
    "result" => {
        "data-source" => {"java:/H2DS" => {
            "connection-url" => "jdbc:h2:mem:test;DB_CLOSE_DELAY=-1",
            "jndi-name" => "java:/H2DS",
            "driver-name" => "h2",
            "pool-name" => "H2DS",
            "use-java-context" => true,
            "enabled" => true,
            "jta" => true,
            "pool-prefill" => true,
            "pool-use-strict-min" => false,
            "user-name" => "sa",
            "password" => "sa",
            "flush-strategy" => "FailingConnectionOnly",
            "background-validation" => false,
            "use-fast-fail" => false,
            "validate-on-match" => false,
            "use-ccm" => true
        }},
        "xa-data-source" => undefined,
        "jdbc-driver" => {"h2" => {
            "driver-name" => "h2",
            "driver-module-name" => "com.h2database.h2",
            "driver-xa-datasource-class-name" => "org.h2.jdbcx.JdbcDataSource"
        }}
    }
}


[standalone@localhost:9999 /] /subsystem=datasources:installed-drivers-list
{
    "outcome" => "success",
    "result" => [{
        "driver-name" => "h2",
        "deployment-name" => undefined,
        "driver-module-name" => "com.h2database.h2",
        "module-slot" => "main",
        "driver-xa-datasource-class-name" => "org.h2.jdbcx.JdbcDataSource",
        "driver-class-name" => "org.h2.Driver",
        "driver-major-version" => 1,
        "driver-minor-version" => 2,
        "jdbc-compliant" => true
    }]
}
Using the web console or the CLI greatly simplifies the deployment of JDBC drivers and the creation of datasources.
The CLI offers a set of commands to create and modify datasources:
[standalone@localhost:9999 /] help
Supported commands:

 [...]

 data-source             - allows to add new, modify and remove existing data sources
 xa-data-source          - allows add new, modify and remove existing XA data sources

For a more detailed description of a specific command,
execute the command with '--help' as the argument.
Using security domains
Information can be found at https://community.jboss.org/wiki/JBossAS7SecurityDomainModel
Deployment of -ds.xml files
Starting with WildFly 8, you have the ability to deploy a -ds.xml file following the schema:
http://www.ironjacamar.org/doc/schema/datasources_1_1.xsd
It is mandatory to use a reference to an already deployed / defined <driver> entry.
This feature is primarily intended for development, and thus has a few limitations to be aware of. It can not be altered in any of the management interfaces (consle, CLI, etc). Only limited runtime information is available. Also, password vaults and security domains are not deployable, so these can not be bundled with a datasource deployment.
Component Reference
The datasource subsystem is provided by the IronJacamar project. For a detailed description of the available configuration properties, please consult the project documentation.
-
IronJacamar homepage: http://ironjacamar.org/
-
Project Documentation: http://ironjacamar.org/documentation.html
-
Schema description: http://www.ironjacamar.org/doc/userguide/1.1/en-US/html_single/index.html#deployingds_descriptor
Messaging
The JMS server configuration is done through the messaging subsystem. In this chapter we are going outline the frequently used configuration options. For a more detailed explanation please consult the HornetQ user guide (See "Component Reference").
Connectors
There are three kind of connectors that can be used to connect to WildFly JMS Server
-
invm-connector can be used by a local client (i.e. one running in the same JVM as the server)
-
netty-connector can be used by a remote client (and uses Netty over TCP for the communication)
-
http-connector can be used by a remote client (and uses Undertow Web Server to upgrade from a HTTP connection)
JMS Connection Factories
There are three kinds of basic JMS connection-factory that depends on the type of connectors that is used.
There is also a pooled-connection-factory which is special in that it is essentially a configuration facade for both the inbound and outbound connectors of the the HornetQ JCA Resource Adapter. An MDB can be configured to use a pooled-connection-factory (e.g. using @ResourceAdapter). In this context, the MDB leverages the inbound connector of the HornetQ JCA RA. Other kinds of clients can look up the pooled-connection-factory in JNDI (or inject it) and use it to send messages. In this context, such a client would leverage the outbound connector of the HornetQ JCA RA. A pooled-connection-factory is also special because:
-
It is only available to local clients, although it can be configured to point to a remote server.
-
As the name suggests, it is pooled and therefore provides superior performance to the clients which are able to use it. The pool size can be configured via the max-pool-size and min-pool-size attributes.
-
It should only be used to send (i.e. produce) messages when looked up in JNDI or injected.
-
It can be configured to use specific security credentials via the user and password attributes. This is useful if the remote server to which it is pointing is secured.
-
Resources acquired from it will be automatically enlisted any on-going JTA transaction. If you want to send a message from an EJB using CMT then this is likely the connection factory you want to use so the send operation will be atomically committed along with the rest of the EJB's transaction operations.
To be clear, the inbound connector of the HornetQ JCA RA (which is for consuming messages) is only used by MDBs and other JCA-based components. It is not available to traditional clients.
Both a connection-factory and a pooled-connection-factory reference a connector declaration.
A netty-connector is associated with a socket-binding which tells the client using the connection-factory where to connect.
-
A connection-factory referencing a netty-connector is suitable to be used by a remote client to send messages to or receive messages from the server (assuming the connection-factory has an appropriately exported entry).
-
A pooled-connection-factory looked up in JNDI or injected which is referencing a netty-connector is suitable to be used by a local client to send messages to a remote server granted the socket-binding references an outbound-socket-binding pointing to the remote server in question.
-
A pooled-connection-factory used by an MDB which is referencing a netty-connector is suitable to consume messages from a remote server granted the socket-binding references an outbound-socket-binding pointing to the remote server in question.
An in-vm-connector is associated with a server-id which tells the client using the connection-factory where to connect (since multiple HornetQ servers can run in a single JVM).
-
A connection-factory referencing an in-vm-connector is suitable to be used by a local client to either send messages to or receive messages from a local server.
-
A pooled-connection-factory looked up in JNDI or injected which is referencing an in-vm-connector is suitable to be used by a local client only to send messages to a local server.
-
A pooled-connection-factory used by an MDB which is referencing an in-vm-connector is suitable only to consume messages from a local server.
A http-connector is associated with the socket-binding that represents the HTTP socket (by default, named http).
-
A connection-factory referencing a http-connector is suitable to be used by a remote client to send messages to or receive messages from the server by connecting to its HTTP port before upgrading to the messaging protocol.
-
A pooled-connection-factory referencing a http-connector is suitable to be used by a local client to send messages to a remote server granted the socket-binding references an outbound-socket-binding pointing to the remote server in question.
-
A pooled-connection-factory used by an MDB which is referencing a http-connector is suitable only to consume messages from a remote server granted the socket-binding references an outbound-socket-binding pointing to the remote server in question.
The entry declaration of a connection-factory or a pooled-connection-factory specifies the JNDI name under which the factory will be exposed. Only JNDI names bound in the "java:jboss/exported" namespace are available to remote clients. If a connection-factory has an entry bound in the "java:jboss/exported" namespace a remote client would look-up the connection-factory using the text after "java:jboss/exported". For example, the "RemoteConnectionFactory" is bound by default to "java:jboss/exported/jms/RemoteConnectionFactory" which means a remote client would look-up this connection-factory using "jms/RemoteConnectionFactory". A pooled-connection-factory should not have any entry bound in the "java:jboss/exported" namespace because a pooled-connection-factory is not suitable for remote clients.
Since JMS 2.0, a default JMS connection factory is accessible to EE application under the JNDI name java:comp/DefaultJMSConnectionFactory. WildFly messaging subsystem defines a pooled-connection-factory that is used to provide this default connection factory. Any parameter change on this pooled-connection-factory will be take into account by any EE application looking the default JMS provider under the JNDI name java:comp/DefaultJMSConnectionFactory.
<subsystem xmlns="urn:jboss:domain:messaging:2.0">
   <hornetq-server>
      [...]
      <connectors>
         <http-connector name="http-connector" socket-binding="http">
            <param key="http-upgrade-endpoint" value="http-acceptor"/>
         </http-connector>
         <http-connector name="http-connector-throughput" socket-binding="http">
            <param key="http-upgrade-endpoint" value="http-acceptor-throughput"/>
            <param key="batch-delay" value="50"/>
         </http-connector>
         <in-vm-connector name="in-vm" server-id="0"/>
      </connectors>
      [...]
      <jms-connection-factories>
         <connection-factory name="InVmConnectionFactory">
            <connectors>
               <connector-ref connector-name="in-vm"/>
            </connectors>
            <entries>
               <entry name="java:/ConnectionFactory"/>
            </entries>
         </connection-factory>
         <connection-factory name="RemoteConnectionFactory">
            <connectors>
               <connector-ref connector-name="http-connector"/>
            </connectors>
            <entries>
               <entry name="java:jboss/exported/jms/RemoteConnectionFactory"/>
            </entries>
         </connection-factory>
         <pooled-connection-factory name="hornetq-ra">
            <transaction mode="xa"/>
            <connectors>
               <connector-ref connector-name="in-vm"/>
            </connectors>
            <entries>
               <entry name="java:/JmsXA"/>
               <!-- Global JNDI entry used to provide a default JMS Connection factory to EE application -->
               <entry name="java:jboss/DefaultJMSConnectionFactory"/>
            </entries>
         </pooled-connection-factory>
      </jms-connection-factories>
      [...]
   </hornetq-server>
</subsystem>
(See standalone/configuration/standalone-full.xml)
JMS Queues and Topics
JMS queues and topics are sub resources of the messaging subsystem. They are defined in the jms-destinations section. One can define either a jms-queue or jms-topic. Each destination must be given a name and contain at least one entry element.
Each entry refers to a JNDI name of the queue or topic. Keep in mind that any jms-queue or jms-topic which needs to be accessed by a remote client needs to have an entry in the "java:jboss/exported" namespace. As with connection factories, if a jms-queue or jms-topic has an entry bound in the "java:jboss/exported" namespace a remote client would look it up using the text after "java:jboss/exported". For example, the following jms-queue "testQueue" is bound to "java:jboss/exported/jms/queue/test" which means a remote client would look-up this jms-queue using "jms/queue/test". A local client could look it up using "java:jboss/exported/jms/queue/test", "java:jms/queue/test", or more simply "jms/queue/test":
<subsystem xmlns="urn:jboss:domain:messaging:2.0">
   <hornetq-server>
      [...]
      <jms-destinations>
         <jms-queue name="testQueue">
             <entry name="jms/queue/test"/>
             <entry name="java:jboss/exported/jms/queue/test"/>
         </jms-queue>
         <jms-topic name="testTopic">
            <entry name="jms/topic/test"/>
            <entry name="java:jboss/exported/jms/topic/test"/>
         </jms-topic>
      </jms-destinations>
   </hornetq-server>
</subsystem>
(See standalone/configuration/standalone-full.xml)
JMS endpoints can easily be created through the CLI:
[standalone@localhost:9990 /] jms-queue add --queue-address=myQueue --entries=queues/myQueue
[standalone@localhost:9990 /] /subsystem=messaging/hornetq-server=default/jms-queue=myQueue:read-resource
{
    "outcome" => "success",
    "result" => {
        "durable" => true,
        "entries" => ["queues/myQueue"],
        "selector" => undefined
    }
}
A number of additional commands to maintain the JMS subsystem are available as well:
[standalone@localhost:9990 /] jms-queue --help --commands
add
...
remove
To read the description of a specific command execute 'jms-queue command_name --help'.
Dead Letter & Redelivery
Some of the settings are applied against an address wild card instead of a specific messaging destination. The dead letter queue and redelivery settings belong into this group:
<subsystem xmlns="urn:jboss:domain:messaging:2.0">
   <hornetq-server>
      [...]
      <address-settings>
         <address-setting match="#">
            <dead-letter-address>jms.queue.DLQ</dead-letter-address>
            <expiry-address>jms.queue.ExpiryQueue</expiry-address>
            <redelivery-delay>0</redelivery-delay>
            [...]
         </address-setting>
      </address-settings>
      [...]
   </hornetq-server>
</subsystem>
(See standalone/configuration/standalone-full.xml)
Security Settings for HornetQ addresses and JMS destinations
Security constraints are matched against an address wildcard, similar to the DLQ and redelivery settings. Note: Multiple roles are separated by spaces.
<subsystem xmlns="urn:jboss:domain:messaging:2.0">
   <hornetq-server>
      [...]
      <security-settings>
         <security-setting match="#">
            <permission type="send" roles="guest"/>
            <permission type="consume" roles="guest"/>
            <permission type="createNonDurableQueue" roles="role1"/>
            <permission type="deleteNonDurableQueue" roles="role1 role2"/>
         </security-setting>
      </security-settings>
      [...]
   </hornetq-server>
</subsystem>
(See standalone/configuration/standalone-full.xml)
Security Domain for Users
By default, HornetQ will use the "other" JAAS security domain. This domain is used to authenticate users making connections to HornetQ and then they are authorized to perform specific functions based on their role(s) and the security-settings described above. This domain can be changed by using security-domain, e.g.:
<subsystem xmlns="urn:jboss:domain:messaging:2.0">
   <hornetq-server>
      [...]
      <security-domain>mySecurityDomain</security-domain>
      [...]
   </hornetq-server>
</subsystem>
Cluster Authentication
If the HornetQ server is configured to be clustered ( <clustered>true</clustered> ), it will use the <cluster-user> and <cluster-password> attributes to connect to other HornetQ nodes in the cluster.
If you do not change the default value of <cluster-password>, HornetQ will fail to authenticate with the error:
HQ224018: Failed to create session: HornetQExceptionerrorType=CLUSTER_SECURITY_EXCEPTION message=HQ119099: Unable to authenticate cluster user: HORNETQ.CLUSTER.ADMIN.USER
To prevent this error, you must specify a value for <cluster-password>. It is possible to encrypt this value by following this guide.
Alternatively, you can use the system property jboss.messaging.cluster.password to specify the cluster password from the command line.
Deployment of -jms.xml files
Starting with WildFly 8, you have the ability to deploy a -jms.xml file defining JMS destinations, e.g.:
<?xml version="1.0" encoding="UTF-8"?>
<messaging-deployment xmlns="urn:jboss:messaging-deployment:1.0">
   <hornetq-server>
      <jms-destinations>
         <jms-queue name="sample">
            <entry name="jms/queue/sample"/>
            <entry name="java:jboss/exported/jms/queue/sample"/>
         </jms-queue>
      </jms-destinations>
   </hornetq-server>
</messaging-deployment>
|
|
This feature is primarily intended for development as destinations deployed this way can not be managed with any of the provided management tools (e.g. console, CLI, etc). |
JMS Bridge
The function of a JMS bridge is to consume messages from a source JMS destination, and send them to a target JMS destination. Typically either the source or the target destinations are on different servers.
The bridge can also be used to bridge messages from other non HornetQ JMS servers, as long as they are JMS 1.1 compliant.
The JMS Bridge is provided by the HornetQ project. Fo a detailed description of the available configuration properties, please consult the project documentation.
Modules for other messaging brokers
Source and target JMS resources (destination and connection factories) are looked up using JNDI.
If either the source or the target resources are managed by another messaging server than WildFly, the required client classes must be bundled in a module. The name of the module must then be declared when the JMS Bridge is configured.
The use of a JMS bridges with any messaging provider will require to create a module containing the jar of this provider.
Let's suppose we want to use an hypothetical messaging provider named AcmeMQ. We want to bridge messages coming from a source AcmeMQ destination to a target destination on the local WildFly messaging server. To lookup AcmeMQ resources from JNDI, 2 jars are required, acmemq-1.2.3.jar, mylogapi-0.0.1.jar (please note these jars do not exist, this is just for the example purpose). We must not include a JMS jar since it will be provided by a WildFly module directly.
To use these resources in a JMS bridge, we must bundle them in a WildFly module:
in JBOSS_HOME/modules, we create the layout:
modules/
`-- org
    `-- acmemq
        `-- main
            |-- acmemq-1.2.3.jar
            |-- mylogapi-0.0.1.jar
            `-- module.xml
We define the module in module.xml:
<?xml version="1.0" encoding="UTF-8"?>
<module xmlns="urn:jboss:module:1.1" name="org.acmemq">
    <properties>
        <property name="jboss.api" value="private"/>
    </properties>


    <resources>
        <!-- insert resources required to connect to the source or target   -->
        <!-- messaging brokers if it not another WildFly instance           -->
        <resource-root path="acmemq-1.2.3.jar" />
        <resource-root path="mylogapi-0.0.1.jar" />
    </resources>


    <dependencies>
       <!-- add the dependencies required by JMS Bridge code                -->
       <module name="javax.api" />
       <module name="javax.jms.api" />
       <module name="javax.transaction.api"/>
       <module name="org.jboss.remote-naming"/>
       <!-- we depend on org.hornetq module since we will send messages to  -->
       <!-- the HornetQ server embedded in the local WildFly instance       -->
       <module name="org.hornetq" />
    </dependencies>
</module>
Configuration
A JMS bridge is defined inside a jms-bridge section of the `messaging` subsystem in the XML configuration files.
<subsystem xmlns="urn:jboss:domain:messaging:2.0">
   <jms-bridge name="myBridge" module="org.acmemq">
      <source>
         <connection-factory name="ConnectionFactory"/>
         <destination name="sourceQ"/>
         <user>user1</user>
         <password>pwd1</password>
         <context>
            <property key="java.naming.factory.initial" value="org.acmemq.jndi.AcmeMQInitialContextFactory"/>
            <property key="java.naming.provider.url"    value="tcp://127.0.0.1:9292"/>
         </context>
      </source>
      <target>
         <connection-factory name="/jms/invmTargetCF"/>
         <destination name="/jms/targetQ"/>
      </target>
      <quality-of-service>AT_MOST_ONCE</quality-of-service>
      <failure-retry-interval>500</failure-retry-interval>
      <max-retries>1</max-retries>
      <max-batch-size>500</max-batch-size>
      <max-batch-time>500</max-batch-time>
      <add-messageID-in-header>true</add-messageID-in-header>
   </jms-bridge>
</subsystem>
The source and target sections contain the name of the JMS resource (connection-factory and destination) that will be looked up in JNDI.
It optionally defines the user and password credentials. If they are set, they will be passed as arguments when creating the JMS connection from the looked up ConnectionFactory.
It is also possible to define JNDI context properties in the context section. If the context section is absent, the JMS resources will be looked up in the local WildFly instance (as it is the case in the target section in the example above).
Management commands
A JMS Bridge can also be managed using the WildFly command line interface:
[standalone@localhost:9990 /] /subsystem=messaging/jms-bridge=myBridge/:add(module="org.acmemq",      \
      source-destination="sourceQ",                                                                   \
      source-connection-factory="ConnectionFactory",                                                  \
      source-user="user1",                                                                            \
      source-password="pwd1",                                                                         \
      source-context={"java.naming.factory.initial" => "org.acmemq.jndi.AcmeMQInitialContextFactory", \
                      "java.naming.provider.url" => "tcp://127.0.0.1:9292"},                          \
      target-destination="/jms/targetQ",                                                              \
      target-connection-factory="/jms/invmTargetCF",                                                  \
      quality-of-service=AT_MOST_ONCE,                                                                \
      failure-retry-interval=500,                                                                     \
      max-retries=1,                                                                                  \
      max-batch-size=500,                                                                             \
      max-batch-time=500,                                                                             \
      add-messageID-in-header=true)
{"outcome" => "success"}
You can also see the complete JMS Bridge resource description from the CLI:
[standalone@localhost:9990 /] /subsystem=messaging/jms-bridge=*/:read-resource-description
{
    "outcome" => "success",
    "result" => [{
        "address" => [
            ("subsystem" => "messaging"),
            ("jms-bridge" => "*")
        ],
        "outcome" => "success",
        "result" => {
            "description" => "A JMS bridge instance.",
            "attributes" => {
                ...
        }
    }]
}
Component Reference
The messaging subsystem is provided by the HornetQ project. For a detailed description of the available configuration properties, please consult the project documentation.
-
HornetQ homepage: http://www.jboss.org/hornetq
-
Project Documentation: http://www.jboss.org/hornetq/docs
Web
Couldn't find a page to include called: Web subsystem configuration
Web services
Domain management
JBossWS components are provided to the application server through the webservices subsystem. JBossWS components handle the processing of WS endpoints. The subsystem supports the configuration of published endpoint addresses, and endpoint handler chains. A default webservice subsystem is provided in the server's domain and standalone configuration files.
Structure of the webservices subsystem
Published endpoint address
JBossWS supports the rewriting of the <soap:address> element of endpoints published in WSDL contracts. This feature is useful for controlling the server address that is advertised to clients for each endpoint.
The following elements are available and can be modified (all are optional and require server restart upon modification):
|
Name |
Type |
Description |
|
modify-wsdl-address |
boolean |
This boolean enables and disables the address rewrite functionality. |
|
wsdl-host |
string |
The hostname / IP address to be used for rewriting <soap:address>. |
|
wsdl-port |
int |
Set this property to explicitly define the HTTP port that will be used for rewriting the SOAP address. |
|
wsdl-secure-port |
int |
Set this property to explicitly define the HTTPS port that will be used for rewriting the SOAP address. |
Predefined endpoint configurations
JBossWS enables extra setup configuration data to be predefined and associated with an endpoint implementation. Predefined endpoint configurations can be used for JAX-WS client and JAX-WS endpoint setup. Endpoint configurations can include JAX-WS handlers and key/value properties declarations. This feature provides a convenient way to add handlers to WS endpoints and to set key/value properties that control JBossWS and Apache CXF internals (see Apache CXF configuration).
The webservices subsystem provides schema to support the definition of named sets of endpoint configuration data. Annotation, org.jboss.ws.api.annotation.EndpointConfig is provided to map the named configuration to the endpoint implementation.
There is no limit to the number of endpoint configurations that can be defined within the webservices subsystem. Each endpoint configuration must have a name that is unique within the webservices subsystem. Endpoint configurations defined in the webservices subsystem are available for reference by name through the annotation to any endpoint in a deployed application.
WildFly ships with two predefined endpoint configurations. Standard-Endpoint-Config is the default configuration. Recording-Endpoint-Config is an example of custom endpoint configuration and includes a recording handler.
[standalone@localhost:9999 /] /subsystem=webservices:read-resource
{
    "outcome" => "success",
    "result" => {
        "endpoint" => {},
        "modify-wsdl-address" => true,
        "wsdl-host" => expression "${jboss.bind.address:127.0.0.1}",
        "endpoint-config" => {
            "Standard-Endpoint-Config" => undefined,
            "Recording-Endpoint-Config" => undefined
        }
    }
}
The Standard-Endpoint-Config is a special endpoint configuration. It is used for any endpoint that does not have an explicitly assigned endpoint configuration.
Endpoint configs
Endpoint configs are defined using the endpoint-config element. Each endpoint configuration may include properties and handlers set to the endpoints associated to the configuration.
[standalone@localhost:9999 /] /subsystem=webservices/endpoint-config=Recording-Endpoint-Config:read-resource
{
    "outcome" => "success",
    "result" => {
        "post-handler-chain" => undefined,
        "property" => undefined,
        "pre-handler-chain" => {"recording-handlers" => undefined}
    }
}
A new endpoint configuration can be added as follows:
[standalone@localhost:9999 /] /subsystem=webservices/endpoint-config=My-Endpoint-Config:add
{
    "outcome" => "success",
    "response-headers" => {
        "operation-requires-restart" => true,
        "process-state" => "restart-required"
    }
}
Handler chains
Each endpoint configuration may be associated with zero or more PRE and POST handler chains. Each handler chain may include JAXWS handlers. For outbound messages the PRE handler chains are executed before any handler that is attached to the endpoint using the standard means, such as with annotation @HandlerChain, and POST handler chains are executed after those objects have executed. For inbound messages the POST handler chains are executed before any handler that is attached to the endpoint using the standard means and the PRE handler chains are executed after those objects have executed.
* Server inbound messages
Client --> ... --> POST HANDLER --> ENDPOINT HANDLERS --> PRE HANDLERS --> Endpoint

* Server outbound messages
Endpoint --> PRE HANDLER --> ENDPOINT HANDLERS --> POST HANDLERS --> ... --> Client
The protocol-binding attribute must be used to set the protocols for which the chain will be triggered.
[standalone@localhost:9999 /] /subsystem=webservices/endpoint-config=Recording-Endpoint-Config/pre-handler-chain=recording-handlers:read-resource
{
    "outcome" => "success",
    "result" => {
        "protocol-bindings" => "##SOAP11_HTTP ##SOAP11_HTTP_MTOM ##SOAP12_HTTP ##SOAP12_HTTP_MTOM",
        "handler" => {"RecordingHandler" => undefined}
    },
    "response-headers" => {"process-state" => "restart-required"}
}
A new handler chain can be added as follows:
[standalone@localhost:9999 /] /subsystem=webservices/endpoint-config=My-Endpoint-Config/post-handler-chain=my-handlers:add(protocol-bindings="##SOAP11_HTTP")
{
    "outcome" => "success",
    "response-headers" => {
        "operation-requires-restart" => true,
        "process-state" => "restart-required"
    }
}
[standalone@localhost:9999 /] /subsystem=webservices/endpoint-config=My-Endpoint-Config/post-handler-chain=my-handlers:read-resource
{
    "outcome" => "success",
    "result" => {
        "handler" => undefined,
        "protocol-bindings" => "##SOAP11_HTTP"
    },
    "response-headers" => {"process-state" => "restart-required"}
}
Handlers
JAXWS handler can be added in handler chains:
[standalone@localhost:9999 /] /subsystem=webservices/endpoint-config=Recording-Endpoint-Config/pre-handler-chain=recording-handlers/handler=RecordingHandler:read-resource
{
    "outcome" => "success",
    "result" => {"class" => "org.jboss.ws.common.invocation.RecordingServerHandler"},
    "response-headers" => {"process-state" => "restart-required"}
}
[standalone@localhost:9999 /] /subsystem=webservices/endpoint-config=My-Endpoint-Config/post-handler-chain=my-handlers/handler=foo-handler:add(class="org.jboss.ws.common.invocation.RecordingServerHandler")
{
    "outcome" => "success",
    "response-headers" => {
        "operation-requires-restart" => true,
        "process-state" => "restart-required"
    }
}
Endpoint-config handler classloading
The class attribute is used to provide the fully qualified class name of the handler. At deploy time, an instance of the class is created for each referencing deployment. For class creation to succeed, either the deployment classloader or the classloader for module, org.jboss.as.webservices.server.integration, must to be able to load the handler class.
Runtime information
Each web service endpoint is exposed through the deployment that provides the endpoint implementation. Each endpoint can be queried as a deployment resource. For further information please consult the chapter "Application Deployment". Each web service endpoint specifies a web context and a WSDL Url:
[standalone@localhost:9999 /] /deployment="*"/subsystem=webservices/endpoint="*":read-resource
{
   "outcome" => "success",
   "result" => [{
       "address" => [
           ("deployment" => "jaxws-samples-handlerchain.war"),
           ("subsystem" => "webservices"),
           ("endpoint" => "jaxws-samples-handlerchain:TestService")
       ],
       "outcome" => "success",
       "result" => {
           "class" => "org.jboss.test.ws.jaxws.samples.handlerchain.EndpointImpl",
           "context" => "jaxws-samples-handlerchain",
           "name" => "TestService",
           "type" => "JAXWS_JSE",
           "wsdl-url" => "http://localhost:8080/jaxws-samples-handlerchain?wsdl"
       }
   }]
}
Component Reference
The web service subsystem is provided by the JBossWS project. For a detailed description of the available configuration properties, please consult the project documentation.
-
JBossWS homepage: http://www.jboss.org/jbossws
-
Project Documentation: https://docs.jboss.org/author/display/JBWS
Logging
Overview
The overall server logging configuration is represented by the logging subsystem. It consists of four notable parts: handler configurations, logger, the root logger declarations (aka log categories) and logging profiles. Each logger does reference a handler (or set of handlers). Each handler declares the log format and output:
<subsystem xmlns="urn:jboss:domain:logging:1.0">
   <console-handler name="CONSOLE" autoflush="true">
       <level name="DEBUG"/>
       <formatter>
           <pattern-formatter pattern="%d{HH:mm:ss,SSS} %-5p [%c] (%t) %s%E%n"/>
       </formatter>
   </console-handler>
   <periodic-rotating-file-handler name="FILE" autoflush="true">
       <formatter>
           <pattern-formatter pattern="%d{HH:mm:ss,SSS} %-5p [%c] (%t) %s%E%n"/>
       </formatter>
       <file relative-to="jboss.server.log.dir" path="server.log"/>
       <suffix value=".yyyy-MM-dd"/>
   </periodic-rotating-file-handler>
   <logger category="com.arjuna">
       <level name="WARN"/>
   </logger>
   [...]
   <root-logger>
       <level name="DEBUG"/>
       <handlers>
           <handler name="CONSOLE"/>
           <handler name="FILE"/>
       </handlers>
   </root-logger>
</subsystem>
Attributes
The root resource contains two notable attributes add-logging-api-dependencies and use-deployment-logging-config.
logging-api-dependencies
The add-logging-api-dependencies controls whether or not the container adds implicit logging API dependencies to your deployments. If set to true, the default, all the implicit logging API dependencies are added. If set to false the dependencies are not added to your deployments.
deployment-logging-config
The use-deployment-logging-config controls whether or not your deployment is scanned for per-deployment logging. If set to true, the default, per-deployment logging is enabled. Set to false to disable this feature.
deployment Logging
Per-deployment logging allows you to add a logging configuration file to your deployment and have the logging for that deployment configured according to the configuration file. In an EAR the configuration should be in the META-INF directory. In a WAR or JAR deployment the configuration file can be in either the META-INF or WEB-INF/classes directories.
The following configuration files are allowed:
-
logging.properties
-
jboss-logging.properties
-
log4j.properties
-
log4j.xml
-
jboss-log4j.xml
You can also disable this functionality by changing the use-deployment-logging-config attribute to false.
Logging Profiles
Logging profiles are like additional logging subsystems. Each logging profile constists of three of the four notable parts listed above: handler configurations, logger and the root logger declarations.
You can assign a logging profile to a deployment via the deployments manifest. Add a Logging-Profile entry to the MANIFEST.MF file with a value of the logging profile id. For example a logging profile defined on /subsystem=logging/logging-profile=ejbs the MANIFEST.MF would look like:
Manifest-Version: 1.0
Logging-Profile: ejbs
A logging profile can be assigned to any number of deployments. Using a logging profile also allows for runtime changes to the configuration. This is an advantage over the per-deployment logging configuration as the redeploy is not required for logging changes to take affect.
Default Log File Locations
Managed Domain
In a managed domain two types of log files do exist: Controller and server logs. The controller components govern the domain as whole. It's their responsibility to start/stop server instances and execute managed operations throughout the domain. Server logs contain the logging information for a particular server instance. They are co-located with the host the server is running on.
For the sake of simplicity we look at the default setup for managed domain. In this case, both the domain controller components and the servers are located on the same host:
|
Process |
Log File |
|
Host Controller |
./domain/log/host-controller.log |
|
Process Controller |
./domain/log/process-controller.log |
|
"Server One" |
./domain/servers/server-one/log/server.log |
|
"Server Two" |
./domain/servers/server-two/log/server.log |
|
"Server Three" |
./domain/servers/server-three/log/server.log |
Standalone Server
The default log files for a standalone server can be found in the log subdirectory of the distribution:
|
Process |
Log File |
|
Server |
./standalone/log/server.log |
Filter Expressions
|
Filter Type |
Expression |
Description |
Parameter(s) |
Examples |
|
accept |
accept |
Accepts all log messages. |
None |
accept |
|
deny |
deny |
enies all log messages. |
None |
deny |
|
not |
not(filterExpression) |
Accepts a filter as an argument and inverts the returned value. |
The expression takes a single filter for it's argument. |
not(match("JBAS")) |
|
all |
all(filterExpressions) |
A filter consisting of several filters in a chain. If any filter find the log message to be unloggable, the message will not be logged and subsequent filters will not be checked. |
The expression takes a comma delimited list of filters for it's argument. |
all(match("JBAS"), match("WELD")) |
|
any |
any(filterExpressions) |
A filter consisting of several filters in a chain. If any filter fins the log message to be loggable, the message will be logged and the subsequent filters will not be checked. |
The expression takes a comma delimited list of filters for it's argument. |
any(match("JBAS"), match("WELD")) |
|
levelChange |
levelChange(level) |
A filter which modifies the log record with a new level. |
The expression takes a single string based level for it's argument. |
levelChange(WARN) |
|
levels |
levels(levels) |
A filter which includes log messages with a level that is listed in the list of levels. |
The expression takes a comma delimited list of string based levels for it's argument. |
levels(DEBUG, INFO, WARN, ERROR) |
|
levelRange |
levelRange([minLevel,maxLevel]) |
A filter which logs records that are within the level range. |
The filter expression uses a "[" to indicate a minimum inclusive level and a "]" to indicate a maximum inclusive level. Otherwise use "(" or ")" respectively indicate exclusive. The first argument for the expression is the minimum level allowed, the second argument is the maximum level allowed. |
|
|
match |
match("pattern") |
A regular-expression based filter. The raw unformatted message is used against the pattern. |
The expression takes a regular expression for it's argument. match("JBAS\d+") |
|
|
substitute |
substitute("pattern", "replacement value") |
A filter which replaces the first match to the pattern with the replacement value. |
The first argument for the expression is the pattern the second argument is the replacement text. |
substitute("JBAS", "EAP") |
|
substituteAll |
substituteAll("pattern", "replacement value") |
A filter which replaces all matches of the pattern with the replacement value. |
The first argument for the expression is the pattern the second argument is the replacement text. |
substituteAll("JBAS", "EAP") |
List Log Files and Reading Log Files
Log files can be listed and viewed via management operations. The log files allowed to be listed and/or viewed is intentionally limited to files that exist in the jboss.server.log.dir and are associated with a known file handler. Known file handler types include file-handler, periodic-rotating-file-handler and size-rotating-file-handler. The operations are valid in both standalone and domain modes.
List Log Files
The list-log-files operation is available on the root logging resource, /subsystem=logging in standalone CLI syntax. The files listed are the only files allowed to be read by the read-log-file operation.
CLI command and output
[standalone@localhost:9990 /] /subsystem=logging:list-log-files
{
    "outcome" => "success",
    "result" => [
        {
            "file-name" => "server.log",
            "file-size" => 10973L,
            "last-modified-date" => "2014-02-14T14:16:49.000-0800"
        },
        {
            "file-name" => "server.log.2014-02-12",
            "file-size" => 27688L,
            "last-modified-date" => "2014-02-12T11:20:35.000-0800"
        },
        {
            "file-name" => "server.log.2014-02-13",
            "file-size" => 359154L,
            "last-modified-date" => "2014-02-13T20:43:49.000-0800"
        }
    ]
}
Read Log File
The read-log-file operation is available on the root logging resource, /subsystem=logging in standalone CLI syntax. Only files available in the list-log-files operation are allowed to be read. This operation has one required parameters and 4 additional parameters.
|
Name |
Description |
|
name (required) |
the name of the log file to be read |
|
encoding |
the encoding the file should be read in |
|
lines |
the number of lines from the file. A value of -1 indicates all lines should be read. |
|
skip |
the number of lines to skip before reading. |
|
tail |
true to read from the end of the file up or false to read top down. |
CLI command and output
[standalone@localhost:9990 /] /subsystem=logging:read-log-file(name=server.log)
{
    "outcome" => "success",
    "result" => [
        "2014-02-14 14:16:48,781 INFO  [org.jboss.as.server.deployment.scanner] (MSC service thread 1-11) JBAS015012: Started FileSystemDeploymentService for directory /home/jperkins/servers/wildfly-8.0.0.Final/standalone/deployments",
        "2014-02-14 14:16:48,782 INFO  [org.jboss.as.connector.subsystems.datasources] (MSC service thread 1-8) JBAS010400: Bound data source [java:jboss/myDs]",
        "2014-02-14 14:16:48,782 INFO  [org.jboss.as.connector.subsystems.datasources] (MSC service thread 1-15) JBAS010400: Bound data source [java:jboss/datasources/ExampleDS]",
        "2014-02-14 14:16:48,786 INFO  [org.jboss.as.server.deployment] (MSC service thread 1-9) JBAS015876: Starting deployment of \"simple-servlet.war\" (runtime-name: \"simple-servlet.war\")",
        "2014-02-14 14:16:48,978 INFO  [org.jboss.ws.common.management] (MSC service thread 1-10) JBWS022052: Starting JBoss Web Services - Stack CXF Server 4.2.3.Final",
        "2014-02-14 14:16:49,160 INFO  [org.wildfly.extension.undertow] (MSC service thread 1-16) JBAS017534: Registered web context: /simple-servlet",
        "2014-02-14 14:16:49,189 INFO  [org.jboss.as.server] (Controller Boot Thread) JBAS018559: Deployed \"simple-servlet.war\" (runtime-name : \"simple-servlet.war\")",
        "2014-02-14 14:16:49,224 INFO  [org.jboss.as] (Controller Boot Thread) JBAS015961: Http management interface listening on http://127.0.0.1:9990/management",
        "2014-02-14 14:16:49,224 INFO  [org.jboss.as] (Controller Boot Thread) JBAS015951: Admin console listening on http://127.0.0.1:9990",
        "2014-02-14 14:16:49,225 INFO  [org.jboss.as] (Controller Boot Thread) JBAS015874: WildFly 8.0.0.Final \"WildFly\" started in 1906ms - Started 258 of 312 services (90 services are lazy, passive or on-demand)"
    ]
}
FAQ
Why is there a logging.properties file?
You may have noticed that there is a logging.properties file in the configuration directory. This logging configuration is used when the server boots up until the logging subsystem kicks in. If the logging subsystem is not included in your configuration, then this would act as the logging configuration for the entire server.
The logging.properties file is overwritten at boot and with each change to the logging subsystem. Any changes made to the file are not persisted. Any changes made to the XML configuration or via management operations will be persisted to the logging.properties file and used on the next boot.
JMX
The JMX subsystem registers a service with the Remoting endpoint so that remote access to JMX can be obtained over the exposed Remoting connector.
This is switched on by default in standalone mode and accessible over port 9990 but in domain mode is switched off so needs to be enabled - in domain mode the port will be the port of the Remoting connector for the WildFly 8 instance to be monitored.
To use the connector you can access it in the standard way using a service:jmx URL:
import javax.management.MBeanServerConnection;
import javax.management.remote.JMXConnector;
import javax.management.remote.JMXConnectorFactory;
import javax.management.remote.JMXServiceURL;

public class JMXExample {

    public static void main(String[] args) throws Exception {
        //Get a connection to the WildFly 8 MBean server on localhost
        String host = "localhost";
        int port = 9990;  // management-web port
        String urlString =
            System.getProperty("jmx.service.url","service:jmx:http-remoting-jmx://" + host + ":" + port);
        JMXServiceURL serviceURL = new JMXServiceURL(urlString);
        JMXConnector jmxConnector = JMXConnectorFactory.connect(serviceURL, null);
        MBeanServerConnection connection = jmxConnector.getMBeanServerConnection();

        //Invoke on the WildFly 8 MBean server
        int count = connection.getMBeanCount();
        System.out.println(count);
        jmxConnector.close();
    }
}
You also need to set your classpath when running the above example. The following script covers Linux. If your environment is much different, paste your script when you have it working.
!/bin/bash
# specify your WildFly 8 folder
export YOUR_JBOSS_HOME=~/WildFly8
java -classpath $YOUR_JBOSS_HOME/bin/client/jboss-client.jar:./ JMXExample
You can also connect using jconsole.
If using jconsole use the jconsole.sh and jconsole.bat scripts included in the /bin directory of the WildFly 8 distribution as these set the classpath as required to connect over Remoting.
In addition to the standard JVM MBeans, the WildFly 8 MBean server contains the following MBeans:
|
JMX ObjectName |
Description |
|
jboss.msc:type=container,name=jboss-as |
Exposes management operations on the JBoss Modular Service Container, which is the dependency injection framework at the heart of WildFly 8. It is useful for debugging dependency problems, for example if you are integrating your own subsystems, as it exposes operations to dump all services and their current states |
|
jboss.naming:type=JNDIView |
Shows what is bound in JNDI |
|
jboss.modules:type=ModuleLoader,name=* |
This collection of MBeans exposes management operations on JBoss Modules classloading layer. It is useful for debugging dependency problems arising from missing module dependencies |
Audit logging
Audit logging for the JMX MBean server managed by the JMX subsystem. The resource is at /subsystem=jmx/configuration=audit-log and its attributes are similar to the ones mentioned for /core-service=management/access=audit/logger=audit-log in Audit logging.
|
Attribute |
Description |
|
enabled |
true to enable logging of the JMX operations |
|
log-boot |
true to log the JMX operations when booting the server, false otherwise |
|
log-read-only |
If true all operations will be audit logged, if false only operations that change the model will be logged |
Then which handlers are used to log the management operations are configured as handler=* children of the logger. These handlers and their formatters are defined in the global /core-service=management/access=audit section mentioned in Audit logging.
JSON Formatter
The same JSON Formatter is used as described in Audit logging. However the records for MBean Server invocations have slightly different fields from those logged for the core management layer.
2013-08-29 18:26:29 - {
    "type" : "jmx",
    "r/o" : false,
    "booting" : false,
    "version" : "8.0.0.Beta1-SNAPSHOT",
    "user" : "$local",
    "domainUUID" : null,
    "access" : "JMX",
    "remote-address" : "127.0.0.1/127.0.0.1",
    "method" : "invoke",
    "sig" : [
        "javax.management.ObjectName",
        "java.lang.String",
        "[Ljava.lang.Object;",
        "[Ljava.lang.String;"
    ],
    "params" : [
        "java.lang:type=Threading",
        "getThreadInfo",
        "[Ljava.lang.Object;@5e6c33c",
        "[Ljava.lang.String;@4b681c69"
    ]
}
It includes an optional timestamp and then the following information in the json record
|
Field name |
Description |
|
type |
This will have the value jmx meaning it comes from the jmx subsystem |
|
r/o |
true if the operation has read only impact on the MBean(s) |
|
booting |
true if the operation was executed during the bootup process, false if it was executed once the server is up and running |
|
version |
The version number of the WildFly instance |
|
user |
The username of the authenticated user. |
|
domainUUID |
This is not currently populated for JMX operations |
|
access |
This can have one of the following values: |
|
remote-address |
The address of the client executing this operation |
|
method |
The name of the called MBeanServer method |
|
sig |
The signature of the called called MBeanServer method |
|
params |
The actual parameters passed in to the MBeanServer method, a simple Object.toString() is called on each parameter. |
|
error |
If calling the MBeanServer method resulted in an error, this field will be populated with Throwable.getMessage() |
Undertow
Couldn't find a page to include called: Undertow (web) subsystem configuration
Deployment Scanner
The deployment scanner is only used in standalone mode. Its job is to monitor a directory for new files and to deploy those files. It can be found in standalone.xml:
<subsystem xmlns="urn:jboss:domain:deployment-scanner:1.0">
   <deployment-scanner scan-interval="5000"
      relative-to="jboss.server.base.dir" path="deployments" />
</subsystem>
You can define more deployment-scanner entries to scan for deployments from more locations. The configuration showed will scan the JBOSS_HOME/standalone/deployments directory every five seconds. The runtime model is shown below, and uses default values for attributes not specified in the xml:
[standalone@localhost:9999 /] /subsystem=deployment-scanner:read-resource(recursive=true)
{
    "outcome" => "success",
    "result" => {"scanner" => {"default" => {
        "auto-deploy-exploded" => false,
        "auto-deploy-zipped" => true,
        "deployment-timeout" => 60L,
        "name" => "default",
        "path" => "deployments",
        "relative-to" => "jboss.server.base.dir",
        "scan-enabled" => true,
        "scan-interval" => 5000
    }}}
}
The attributes are
|
Name |
Type |
Description |
|
name |
STRING |
The name of the scanner. default is used if not specified |
|
path |
STRING |
The actual filesystem path to be scanned. Treated as an absolute path, unless the 'relative-to' attribute is specified, in which case the value is treated as relative to that path. |
|
relative-to |
STRING |
Reference to a filesystem path defined in the "paths" section of the server configuration, or one of the system properties specified on startup. In the example above jboss.server.base.dir resolves to JBOSS_HOME/standalone |
|
scan-enabled |
BOOLEAN |
If true scanning is enabled |
|
scan-interval |
INT |
Periodic interval, in milliseconds, at which the repository should be scanned for changes. A value of less than 1 indicates the repository should only be scanned at initial startup. |
|
auto-deploy-zipped |
BOOLEAN |
Controls whether zipped deployment content should be automatically deployed by the scanner without requiring the user to add a .dodeploy marker file. |
|
auto-deploy-exploded |
BOOLEAN |
Controls whether exploded deployment content should be automatically deployed by the scanner without requiring the user to add a .dodeploy marker file. Setting this to 'true' is not recommended for anything but basic development scenarios, as there is no way to ensure that deployment will not occur in the middle of changes to the content. |
|
deployment-timeout |
LONG |
Timeout, in seconds, a deployment is allows to execute before being canceled. The default is 60 seconds. |
Deployment scanners can be added by modifying standalone.xml before starting up the server or they can be added and removed at runtime using the CLI
[standalone@localhost:9999 /] /subsystem=deployment-scanner/scanner=new:add(scan-interval=10000,relative-to="jboss.server.base.dir",path="other-deployments")
{"outcome" => "success"}
[standalone@localhost:9999 /] /subsystem=deployment-scanner/scanner=new:remove
{"outcome" => "success"}
You can also change the attributes at runtime, so for example to turn off scanning you can do
[standalone@localhost:9999 /] /subsystem=deployment-scanner/scanner=default:write-attribute(name="scan-enabled",value=false)
{"outcome" => "success"}
[standalone@localhost:9999 /] /subsystem=deployment-scanner:read-resource(recursive=true)
{
    "outcome" => "success",
    "result" => {"scanner" => {"default" => {
        "auto-deploy-exploded" => false,
        "auto-deploy-zipped" => true,
        "deployment-timeout" => 60L,
        "name" => "default",
        "path" => "deployments",
        "relative-to" => "jboss.server.base.dir",
        "scan-enabled" => false,
        "scan-interval" => 5000
    }}}
}
Threads subsystem configuration
Defining thread pools
Subsystems can reference thread pools defined by the threading subsystem. Externalizing thread pool in this way has the additional advantage of being able to manage the thread pools via native WildFly management mechanisms, and allows you to share thread pools across subsystems. For example:
<subsystem xmlns="urn:jboss:domain:threads:1.0">
    <thread-factory name="infinispan-factory" priority="1"/>
    <bounded-queue-thread-pool name="infinispan-transport">
        <core-threads count="1"/>
        <queue-length count="100000"/>
        <max-threads count="25"/>
        <thread-factory name="infinispan-factory"/>
    </bounded-queue-thread-pool>
    <bounded-queue-thread-pool name="infinispan-listener">
        <core-threads count="1"/>
        <queue-length count="100000"/>
        <max-threads count="1"/>
        <thread-factory name="infinispan-factory"/>
    </bounded-queue-thread-pool>
    <scheduled-thread-pool name="infinispan-eviction">
        <max-threads count="1"/>
        <thread-factory name="infinispan-factory"/>
    </scheduled-thread-pool>
    <scheduled-thread-pool name="infinispan-repl-queue">
        <max-threads count="1"/>
        <thread-factory name="infinispan-factory"/>
    </scheduled-thread-pool>
</subsystem>
Infinispan configuration:
<cache-container name="web" default-cache="repl" listener-executor="infinispan-listener" eviction-executor="infinispan-eviction" replication-queue-executor="infinispan-repl-queue">
    <transport executor="infinispan-transport"/>
    <replicated-cache name="repl" mode="ASYNC" batching="true">
        <locking isolation="REPEATABLE_READ"/>
        <file-store/>
    </replicated-cache>
</cache-container>
Operation request examples
/profile=production/subsystem=threads/bounded-queue-thread-pool=pool1:write-core-threads (count=0, per-cpu=20)
Simple configuration subsystems
The following subsystems currently have no configuration beyond its root element in the configuration
<subsystem xmlns="urn:jboss:domain:ejb3:1.0"/>
<subsystem xmlns="urn:jboss:domain:jaxrs:1.0"/>
<subsystem xmlns="urn:jboss:domain:remoting:1.0"/>
<subsystem xmlns="urn:jboss:domain:sar:1.0"/>
<subsystem xmlns="urn:jboss:domain:threads:1.0"/>
<subsystem xmlns="urn:jboss:domain:weld:1.0"/>
The presence of each of these turns on a piece of functionality:
|
Name |
Description |
|
EJB3 |
Enables the deployment and functionality of EJB 3.1 applications. |
|
JAXRS |
Enables the deployment and functionality of JAX-RS applications. This is implemented by the RestEasy project |
|
Remoting |
Turns on the remoting subsystem, which is used for the management communication and will be what underlies remote JNDI lookups and remote EJB calls in a future release. |
|
Sar |
Enables the deployment of .SAR archives containing MBean services, as supported by previous versions of WildFly |
|
Threads |
This subsystem is being deprecated and will not be part of the next release |
|
Weld |
Enables the deployment and functionality of CDI applications |
Configuration file history
The management operations may modify the model. When this occurs the xml backing the model is written out again reflecting the latest changes. In addition a full history of the file is maintained. The history of the file goes in a separate directory under the configuration directory.
As mentioned in Command line parameters#parameters the default configuration file can be selected using a command-line parameter. For a standalone server instance the history of the active standalone.xml is kept in jboss.server.config.dir/standalone_xml_history (See Command line parameters#standalone_system_properties for more details). For a domain the active domain.xml and host.xml histories are kept in jboss.domain.config.dir/domain_xml_history and jboss.domain.config.dir/host_xml_history.
The rest of this section will only discuss the history for standalone.xml. The concepts are exactly the same for domain.xml and host.xml.
Within standalone_xml_history itself following a successful first time boot we end up with three new files:
*standalone.initial.xml - This contains the original configuration that was used the first time we successfully booted. This file will never be overwritten. You may of course delete the history directory and any files in it at any stage.
*standalone.boot.xml - This contains the original configuration that was used for the last successful boot of the server. This gets overwritten every time we boot the server successfully.
*standalone.last.xml - At this stage the contents will be identical to standalone.boot.xml. This file gets overwritten each time the server successfully writes the configuration, if there was an unexpected failure writing the configuration this file is the last known successful write.
standalone_xml_history contains a directory called current which should be empty. Now if we execute a management operation that modifies the model, for example adding a new system property using the CLI:
[standalone@localhost:9999 /] /system-property=test:add(value="test123")
{"outcome" => "success"}
What happens is:
-
The original configuration file is backed up to standalone_xml_history/current/standalone.v1.xml. The next change to the model would result in a file called standalone.v2.xml etc. The 100 most recent of these files are kept.
-
The change is applied to the original configuration file
-
The changed original configuration file is copied to standalone.last.xml
When restarting the server, any existing standalone_xml_history/current directory is moved to a new timestamped folder within the standalone_xml_history, and a new current folder is created. These timestamped folders are kept for 30 days.
Snapshots
In addition to the backups taken by the server as described above you can manually take take snapshots which will be stored in the snapshot folder under the _xml_history folder, the automatic backups described above are subject to automatic house keeping so will eventually be automatically removed, the snapshots on the other hand can be entirely managed by the administrator.
You may also take your own snapshots using the CLI:
[standalone@localhost:9999 /] :take-snapshot
{
    "outcome" => "success",
    "result" => {"name" => "/Users/kabir/jboss-7.0.0.CR1/standalone/configuration/standalone_xml_history/snapshot/20110630-172258657standalone.xml"}
}
You can also use the CLI to list all the snapshots
[standalone@localhost:9999 /] :list-snapshots
{
    "outcome" => "success",
    "result" => {
        "directory" => "/Users/kabir/jboss-7.0.0.CR1/standalone/configuration/standalone_xml_history/snapshot",
        "names" => [
            "20110630-165714239standalone.xml",
            "20110630-165821795standalone.xml",
            "20110630-170113581standalone.xml",
            "20110630-171411463standalone.xml",
            "20110630-171908397standalone.xml",
            "20110630-172258657standalone.xml"
        ]
    }
}
To delete a particular snapshot:
[standalone@localhost:9999 /] :delete-snapshot(name="20110630-165714239standalone.xml")
{"outcome" => "success"}
and to delete all snapshots:
[standalone@localhost:9999 /] :delete-snapshot(name="all")
{"outcome" => "success"}
In domain mode executing the snapshot operations against the root node will work against the domain model. To do this for a host model you need to navigate to the host in question:
[domain@localhost:9999 /] /host=master:list-snapshots
{
    "outcome" => "success",
    "result" => {
        "domain-results" => {"step-1" => {
            "directory" => "/Users/kabir/jboss-7.0.0.CR1/domain/configuration/host_xml_history/snapshot",
            "names" => [
                "20110630-141129571host.xml",
                "20110630-172522225host.xml"
            ]
        }},
        "server-operations" => undefined
    }
}
Subsequent Starts
For subsequent server starts it may be desirable to take the state of the server back to one of the previously known states, for a number of items an abbreviated reverence to the file can be used: -
|
Abreviation |
Parameter |
Description |
|
initial |
--server-config=initial |
This will start the server using the initial configuration first used to start the server. |
|
boot |
--server-config=boot |
This will use the configuration from the last successful boot of the server. |
|
last |
--server-config=last |
This will start the server using the configuration backed up from the last successful save. |
|
v? |
--server-config=v? |
This will server the _xml_history/current folder for the configuration where ? is the number of the backup to use. |
|
???? - ????? |
--server-config=???? - ????? |
The server will be started after searching the snapshot folder for the configuration which matches this prefix. |
In addition to this the --server-config parameter can always be used to specify a configuration relative to the jboss.server.config.dir and finally if no matching configuration is found an attempt to locate the configuration as an absolute path will be made.
Starting & stopping Servers in a Managed Domain
Starting a standalone server is done through the bin/standalone.sh script. However in a managed domain server instances are managed by the domain controller and need to be started through the management layer:
First of all, get to know which servers are configured on a particular host:
[domain@localhost:9999 /] :read-children-names(child-type=host)
{
   "outcome" => "success",
   "result" => ["local"]
}


[domain@localhost:9999 /] /host=local:read-children-names(child-type=server-config)
{
   "outcome" => "success",
   "result" => [
       "my-server",
       "server-one",
       "server-three"
   ]
}
Now that we know, that there are two servers configured on host "local", we can go ahead and check their status:
[domain@localhost:9999 /] /host=local/server-config=server-one:read-resource(include-runtime=true)
{
   "outcome" => "success",
   "result" => {
       "auto-start" => true,
       "group" => "main-server-group",
       "interface" => undefined,
       "name" => "server-one",
       "path" => undefined,
       "socket-binding-group" => undefined,
       "socket-binding-port-offset" => undefined,
       "status" => "STARTED",
       "system-property" => undefined,
       "jvm" => {"default" => undefined}
   }
}
You can change the server state through the "start" and "stop" operations
[domain@localhost:9999 /] /host=local/server-config=server-one:stop
{
   "outcome" => "success",
   "result" => "STOPPING"
}
Set the "blocking" attribute to "true" if you want the operation to block until it is finished:
[domain@localhost:9999 /] /host=local/server-config=server-one:restart(blocking=true)
{
   "outcome" => "success",
   "result" => "STARTED"
}
Navigating through the domain topology is much more simple when you use the web interface.
Application deployment
Managed Domain
In a managed domain, deployments are associated with a server group (see Core management concepts). Any server within the server group will then be provided with that deployment.
The domain and host controller components manage the distribution of binaries across network boundaries.
Deployment Commands
Distributing deployment binaries involves two steps: uploading the deployment to the repository the domain controller will use to distribute its contents, and then assigning the deployment to one or more server groups.
You can do this in one sweep with the CLI:
[domain@localhost:9999 /] deploy ~/Desktop/test-application.war
Either --all-server-groups or --server-groups must be specified.

[domain@localhost:9999 /] deploy ~/Desktop/test-application.war --all-server-groups
'test-application.war' deployed successfully.

[domain@localhost:9999 /] deploy --help
[...]
After you've uploaded the binary using the deploy command, it will be available to the domain controller, and assigned to a server group:
[domain@localhost:9999 /] :read-children-names(child-type=deployment)
{
   "outcome" => "success",
   "result" => [
       "mysql-connector-java-5.1.15.jar",
       "test-application.war"
   ]
}

[domain@localhost:9999 /] /server-group=main-server-group/deployment=test-application.war:read-resource
{
   "outcome" => "success",
   "result" => {
       "enabled" => true,
       "name" => "test-application.war",
       "runtime-name" => "test-application.war"
   }
}
You can remove binaries from server groups with the undeploy command:
[domain@localhost:9999 /] undeploy test-application.war --all-relevant-server-groups
Successfully undeployed test-application.war.

[domain@localhost:9999 /] /server-group=main-server-group:read-children-names(child-type=deployment)
{
   "outcome" => "success",
   "result" => []
}
Managing deployments through the web interface provides an alternate, sometimes simpler approach.
Content Repository
Deployments are referenced in the domain configuration file, and co-located with the domain controller:
[...]
<deployments>
   <deployment name="test-application.war"
               runtime-name="test-application.war">
       <content sha1="dda9881fa7811b22f1424b4c5acccb13c71202bd"/>
   </deployment>
</deployments>
[...]
<server-groups>
   <server-group name="main-server-group" profile="default">
       [...]
       <deployments>
           <deployment name="test-application.war" runtime-name="test-application.war"/>
       </deployments>
   </server-group>
</server-groups>
[...]
(See domain/configuration/domain.xml)
The actual binaries are stored in the content subdirectory:
ls domain/content/
  |---/47
  |-----95cc29338b5049e238941231b36b3946952991
  |---/dd
  |-----a9881fa7811b22f1424b4c5acccb13c71202bd
Standalone Server
Deployments on a standalone server work in a similar way to those on managed domains. The main difference is that there are no server group associations.
Deployment Commands
The same CLI commands used for managed domains work for standalone servers when deploying and removing an application:
[standalone@localhost:9999 /] deploy ~/Desktop/test-application.war
'test-application.war' deployed successfully.

[standalone@localhost:9999 /] undeploy test-application.war
Successfully undeployed test-application.war.
File System Deployments
Deployment content (for example, war, ear, jar, and sar files) can be placed in the standalone/deployments directory of the WildFly 8 distribution, in order to be automatically deployed into the server runtime.
Users are encouraged to use the WildFly 8 management APIs to upload and deploy deployment content instead of relying on the deployment scanner that periodically scans the directory, particularly if running production systems.
Deployment Modes
The WildFly 8 filesystem deployment scanner operates in one of two different modes, depending on whether it will directly monitor the deployment content in order to decide to deploy or redeploy it.
Auto-deploy mode:
The scanner will directly monitor the deployment content, automatically deploying new content and redeploying content whose timestamp has changed. This is similiar to the behavior of previous AS releases, although there are differences:
-
A change in any file in an exploded deployment triggers redeploy. Because EE 6 applications do not require deployment descriptors,
there is no attempt to monitor deployment descriptors and only redeploy when a deployment descriptor changes. -
The scanner will place marker files in this directory as an indication of the status of its attempts to deploy or undeploy content. These are detailed below.
Manual deploy mode:
The scanner will not attempt to directly monitor the deployment content and decide if or when the end user wishes the content to be deployed. Instead, the scanner relies on a system of marker files, with the user's addition or removal of a marker file serving as a sort of command telling the scanner to deploy, undeploy or redeploy content.
Auto-deploy mode and manual deploy mode can be independently configured for zipped deployment content and exploded deployment content. This is done via the "auto-deploy" attribute on the deployment-scanner element in the standalone.xml configuration file:
<deployment-scanner scan-interval="5000" relative-to="jboss.server.base.dir"
   path="deployments" auto-deploy-zipped="true" auto-deploy-exploded="false"/>
By default, auto-deploy of zipped content is enabled, and auto-deploy of exploded content is disabled. Manual deploy mode is strongly recommended for exploded content, as exploded content is inherently vulnerable to the scanner trying to auto-deploy partially copied content.
Marker Files
The marker files always have the same name as the deployment content to which they relate, but with an additional file suffix appended. For example, the marker file to indicate the example.war file should be deployed is named example.war.dodeploy. Different marker file suffixes have different meanings.
The relevant marker file types are:
|
File |
Purpose |
|
.dodeploy |
Placed by the user to indicate that the given content should |
|
.skipdeploy |
Disables auto-deploy of the content for as long as the file |
|
.isdeploying |
Placed by the deployment scanner service to indicate that it |
|
.deployed |
Placed by the deployment scanner service to indicate that the |
|
.failed |
Placed by the deployment scanner service to indicate that the |
|
.isundeploying |
Placed by the deployment scanner service to indicate that it |
|
.undeployed |
Placed by the deployment scanner service to indicate that the |
|
.pending |
Placed by the deployment scanner service to indicate that it |
Basic workflows:
All examples assume variable $JBOSS_HOME points to the root of the WildFly 8 distribution.
A) Add new zipped content and deploy it:
-
cp target/example.war/ $JBOSS_HOME/standalone/deployments
-
(Manual mode only) touch $JBOSS_HOME/standalone/deployments/example.war.dodeploy
B) Add new unzipped content and deploy it:
-
cp -r target/example.war/ $JBOSS_HOME/standalone/deployments
-
(Manual mode only) touch $JBOSS_HOME/standalone/deployments/example.war.dodeploy
C) Undeploy currently deployed content:
-
rm $JBOSS_HOME/standalone/deployments/example.war.deployed
D) Auto-deploy mode only: Undeploy currently deployed content:
-
rm $JBOSS_HOME/standalone/deployments/example.war
E) Replace currently deployed zipped content with a new version and deploy it:
-
cp target/example.war/ $JBOSS_HOME/standalone/deployments
-
(Manual mode only) touch $JBOSS_HOME/standalone/deployments/example.war.dodeploy
F) Manual mode only: Replace currently deployed unzipped content with a new version and deploy it:
-
rm $AS/standalone/deployments/example.war.deployed
-
wait for $JBOSS_HOME/standalone/deployments/example.war.undeployed file to appear
-
cp -r target/example.war/ $JBOSS_HOME/standalone/deployments
-
touch $JBOSS_HOME/standalone/deployments/example.war.dodeploy
G) Auto-deploy mode only: Replace currently deployed unzipped content with a new version and deploy it:
-
touch $JBOSS_HOME/standalone/deployments/example.war.skipdeploy
-
cp -r target/example.war/ $JBOSS_HOME/standalone/deployments
-
rm $JBOSS_HOME/standalone/deployments/example.war.skipdeploy
H) Manual mode only: Live replace portions of currently deployed unzipped content without redeploying:
-
cp -r target/example.war/foo.html $JBOSS_HOME/standalone/deployments/example.war
I) Auto-deploy mode only: Live replace portions of currently deployed unzipped content without redeploying:
-
touch $JBOSS_HOME/standalone/deployments/example.war.skipdeploy
-
cp -r target/example.war/foo.html $JBOSS_HOME/standalone/deployments/example.war
J) Manual or auto-deploy mode: Redeploy currently deployed content (i.e. bounce it with no content change):
-
touch $JBOSS_HOME/standalone/deployments/example.war.dodeploy
K) Auto-deploy mode only: Redeploy currently deployed content (i.e. bounce it with no content change):
-
touch $JBOSS_HOME/standalone/deployments/example.war
The above examples use Unix shell commands. Windows equivalents are:
cp src dest --> xcopy /y src dest
cp -r src dest --> xcopy /e /s /y src dest
rm afile --> del afile
touch afile --> echo>> afile
Note that the behavior of 'touch' and 'echo' are different but the differences are not relevant to the usages in the examples above.
Getting Server-specific Metrics in a Managed Domain
In a managed domain, with one or more server groups deployed, we may wish to view server-specific subsystem metrics for a given subsystem resource. In other words, for a given host and a server deployed on that host, we may wish to view metrics defined for a particular subsystem which reflect the run-time behaviour of that particular subsystem on that particular server instance.
For example, we may have a server group of consisting of two servers using the full-ha profile, so forming a cluster, and a distributed application deployed on that cluster. The values for runtime metrics for distributed cache management on each server would reflect the processing activity at that particular server.
Standalone mode
In standalone mode, such resources could be accessed by using the CLI to connect to the standalone instance and executing the command:
/subsystem=infinispan/cache-container=web/distributed-cache=dist:read-resource(include-runtime=true)
The fact that we have used the CLI to connect to a specific server instance allows us to choose the server we wish to read the metrics from.
Domain mode
In domain mode, the same resources could be accessed by using the CLI to connect to the domain controller of the domain and executing the command:
/host=<host>/server=<server>/subsystem=infinispan/cache-container=web/distributed-cache=dist:read-resource(include-runtime=true)
where <host> is the name of the host on which the server resides and <server> is the name of the server of interest.
Note that the command:
/profile=full-ha/subsystem=infinispan/cache-container=web/distributed-cache=dist:read-resource(include-runtime=true)
does not return run-time information concerning specific servers, but rather the configuration of the full-ha profile used in the domain. Any run-time metrics will be marked as undefined.